Introductory Guide
Welcome to the BrightWork for SharePoint Introductory Guide. This Guide contains step-by-step instructions giving you an introduction on how to use BrightWork to manage projects and portfolios on SharePoint.
1. Introduction
This Introductory Guide gives a first time user a tour of what it is like to use BrightWork as a Project Manager, Senior Executive and Team Member. More detailed training for these three key user types served by BrightWork is available in the ‘Role-Based Guides’, and training on project template setup and adjustments is contained in the ‘Configuration Guides’.
What is BrightWork?
BrightWork is a SharePoint- based application for managing work, projects and portfolios.
Prerequisites
There are no other prerequisites for this training session, but reviewing the BrightWork overview movie would be useful.
To view this video, please allow Functional cookies.

Training Environment
-
BrightWork Customers can learn how to use BrightWork to manage work, projects, and portfolios on SharePoint using our training guides. You can use a dedicated training area in your own customer environment. Contact your local BrightWork administrator for details on your training area, or if you need to set one up just contact our Support Team.
-
You can also exercise this Intro Guide using our free 30 day BrightWork Trial.
About User Names
The training guides use fictional user names, and therefore you may see an instruction like ‘Select Anne Wallace from the Assigned To menu’.
If you are taking the training in your own environment, then these names will not likely exist and you should use other names.
2. SharePoint and BrightWork Basics
BrightWork Site Collection
A BrightWork site collection is made up of one top-level site and all individual project sites below it (child sites). You create a BrightWork site collection to host project sites for your organization.
This section will describe a number of important pages and areas in your BrightWork site collection, including Home, Templates Area, Projects Area, Training Area, etc.

Home
The Home page includes a number of important links. Hover over a link for more detail.
Templates Area
This is where the Project and Portfolio site templates that come with BrightWork are stored and maintained, as well as the templates you will create yourself.
Projects Area
This is where you create and manage your projects. You can have more than one Projects Area.
Portfolios Area
This is where you can create special groups of projects for custom reporting purposes.
Training Area
This is where you will complete this guide.
Sample Area
This is a Project Area with sample data to give you an idea of how BrightWork can be used to manage projects.
Sites
A site is a container for a group of related web-pages, lists (e.g. project information) and web parts (e.g. reports). In a site, your team can work on projects, conduct meetings and share information.
Certain sites can have sub-sites. For example, your organization can use Project Offices with individual project sub-sites to achieve cross-project, roll-up reporting.
BrightWork uses standard SharePoint security for access to sites and the assets contained within them.
Lists
A SharePoint list is used for collecting and representing data in a SharePoint site. Typically the data is collected using a form and displayed in a list view. BrightWork includes many lists like Project Tasks, Project Goals and Project Issues.
A single item in a list is called a list item. You will normally have your work assigned as a list item in a list like the Project Tasks.
You should keep your assigned items up to date so your project manager stays informed on your project’s status.
Libraries
Document libraries are collections of files that you can share with team members. For example, you can create a library of common documents for a project. Team members can use their browsers to find the files, read them, and make comments. Users with Microsoft Office 2003 Professional and above can check out and edit the files as if they were on a local or network drive.
Web Parts
A Web Part is a part of a webpage in a SharePoint site. This acts like a window into information that is contained inside or outside the site. This can be information like data in lists, documents in libraries, etc.
Web Parts are useful in project management for displaying reports, charts and other summaries. The most important web part in BrightWork is BrightWork Reporter. The Reporter web part shows information from multiple lists in various sites (e.g. the My Work report that you will learn about later).
Access and Navigation
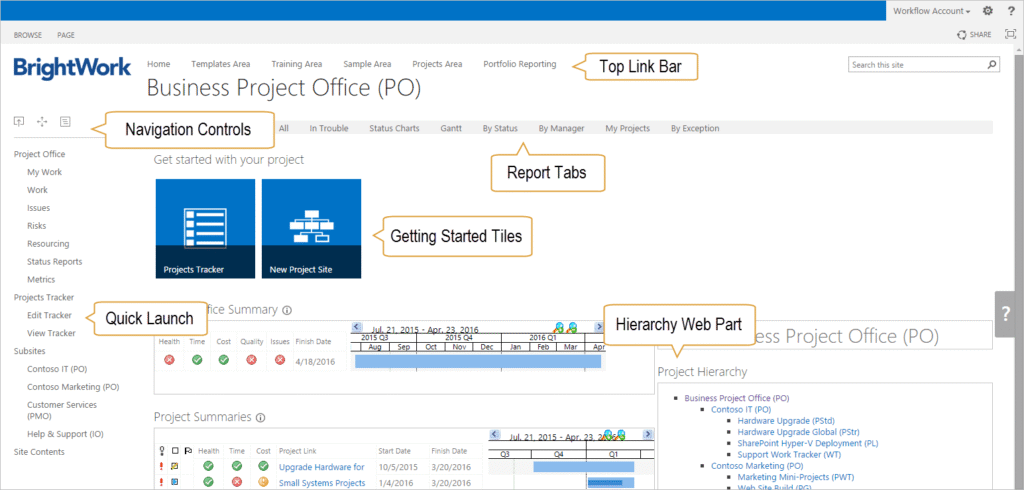
The main navigation elements that will be used in this guide are called out in the below screenshot.
-
The Navigation Controls move you up projects in the hierarchy, or let you see all the projects in your collection. Use these controls if you feel lost or want to quickly head to another part of the site collection.
-
The Top Link Bar generally provides access to the top-level areas and main elements in a BrightWork site collection. In the example above, you can see the Top Link Bar brings you to areas such as BrightWork Help, the Portfolio area and the Templates area.
-
Report Tabs are unique to BrightWork. This extra level of SharePoint navigation provides access to multiple pages with a common grouping. In BrightWork, they generally link to report pages.
-
The Quick Launch provides the navigation for the current site and as such, all of the links are generally to SharePoint lists, document libraries and web part pages. If the project site has sub-sites, links to these sites will also be available on the Quick Launch. You can think of the Quick Launch as a menu into the project management process of the project at hand.
-
The Hierarchy web part displays and links to all the sites underneath it in the hierarchy. The web part is generally available on the home page of a multiple project site or available from a link on the Quick Launch (e.g. Web Hierarchy view).
3. Start Quick
Managing Projects with BrightWork
BrightWork enables Project Management Champions to get BrightWork up and running in the organization with minimal effort.
What will I do? In this section you will play the role of a Project Management Champion introducing BrightWork into the organization. You will edit and report on items in the Projects Tracker list.
Project Management Note: One can manage projects in two ways. Quick way using the Projects Tracker. The Projects Tracker is a great place to start for organizations introducing project management discipline to the company. High-level details can be tracked regarding numerous projects in one location. We will use the Projects Tracker in the next exercise. Detailed way using BrightWork project sites. Project sites can be created using pre-formatted BrightWork templates, such as Project Lite, Project Standard and Project Structured. We will review these template choices in further detail later on.
-
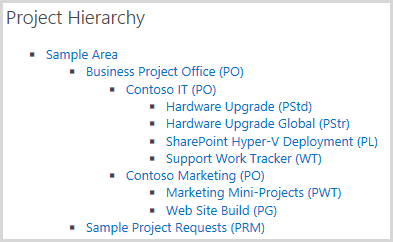
Let’s now work with the Projects Tracker list in the Project Office site. Click Sample Area on the Top Link Bar.

-
Click Business Project Office (PO) on the Project Hierarchy web part to visit an example of a site created with a Project Office template.
Project Management Note: A Project Office is used for reporting over several sub-projects in a hierarchy, or tracking several projects that do not need additional management. To learn more, click here.
Project Management Note: Notice the Project Hierarchy web part on the home page. The site hierarchy displayed in this web part is a typical example of how project, portfolio and work management sites can be easily structured in BrightWork.
-
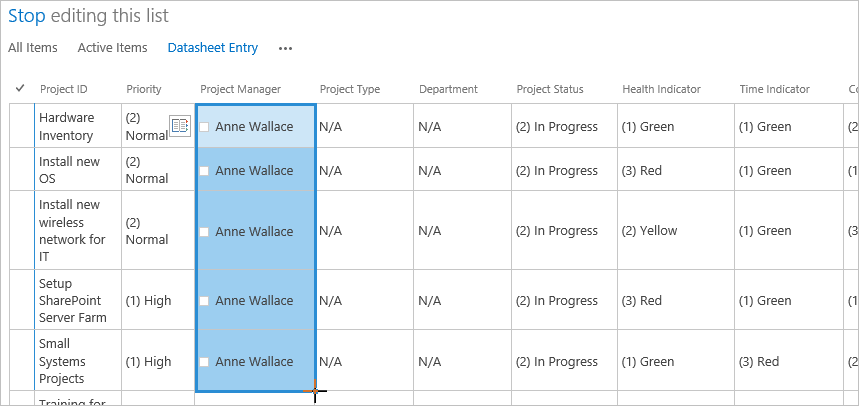
Click Edit Tracker on the Project Office Quick Launch to open the Projects Tracker datasheet.
Project Management Note: The datasheet is a spreadsheet-like interface that allows you to make updates to multiple items in a single location. If you currently submit project status reports using an Excel file, this will be an easy transition to make.
-
Use the datasheet to make some changes to the project, for example, enter your name (as displayed in the top right of your screen) in the Project Manager field for a few projects, and add some dates.
Tip: You can drag cells just like in a spreadsheet.
Tip: Make sure the Pencil in the far left column has cleared to save the line item
-
Click View Tracker on the Quick Launch to see the projects being tracked in the list.
-
Click Business Project Office on the Quick Launch and click through the various report tabs that Senior Executives use to get their project status reports (e.g. By Manager).
Project Management Note: The Project Tracker list allows the Project Manager to quickly update project status as easily as updating an Excel file. Once the Project Manager makes the updates, multiple reports and dashboards are also automatically updated. This enables Senior Executives to get visibility into project statuses.
The Projects Tracker list has a very quick deployment and adoption cycle that allows the organization to get comfortable with SharePoint as a platform for collaborative Project and Portfolio Management. As with all BrightWork lists, you may add, remove, hide, and edit columns, to make it suit your own local process.
If you need more management than the Projects Tracker can provide, you can use the Projects and Work Tracker template. This template uses one site to store high-level project information for multiple projects but also associates tasks, issues and documents with each project. You can find an example of this template in the Sample Area, by clicking into the sub-site named Marketing Mini-Projects (PWT). For more information about the Projects and Work Tracker template, see the related Help notes.
4. Easily Manage Projects
Create a Project Site
Project Management Note: Next you will create a new project site using the Project Lite template. This site becomes the container for all the items needed to collaboratively manage the project. The Project Lite template offers a small to medium amount of Project Management.
-
In the Top-Link bar, click back into the Sample Area.
-
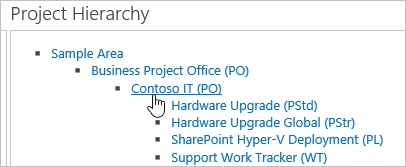
Click Contoso IT (PO) on the Project Hierarchy web part to land on the Project Office to which you want the new project to belong.
-
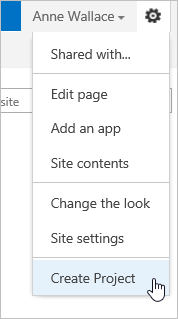
Click Settings | Create Project, or click the New Project Site tile.

-
Give the Project a Title and URL name.
-
Enter your name in the Project Manager field and click Enter on your keyboard. Click Next.
Tip: The Create Project Site process can be customized and defaults can be set to speed up the project creation process. Find out how in BrightWork Help. -
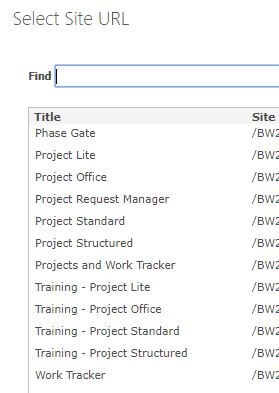
Click the Browse button
-
Hit Enter on your keyboard and double-click on the Training – Project Lite template.
-
Click Next on next few pages and click Finish.
-
Review the Project Management items listed on the Quick Launch (e.g. tasks, documents, issues, etc.) to see the amount of Project Management included.
Project Management Note: This example of the Project Lite template already includes sample tasks for a software project. You could also have added the typical tasks required for a business project in your organization. All the templates can include these placeholder tasks, tailored to the project type, which can enable the project manager to get going quickly.
Manage Tasks on the Project
-
Click the Add Tasks tile on the project home page.
-
Click edit this list.

-
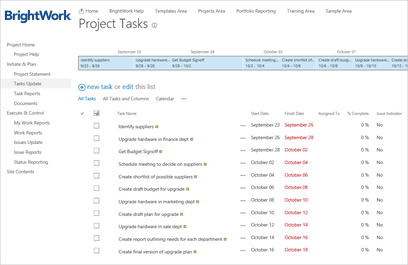
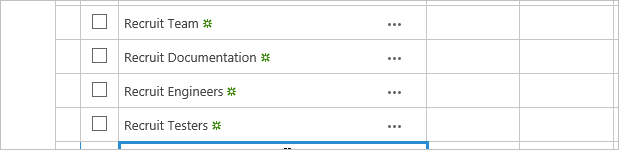
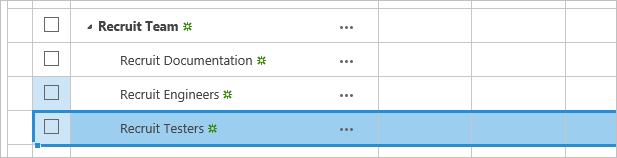
Scroll down to the bottom of the Datasheet and enter a new task; e.g. Recruit Team and hit Enter.
-
Add three other items: Recruit Documentation; Recruit Engineers; and Recruit Testers.
-
Select the Recruit Documentation item by clicking the outer left column.

-
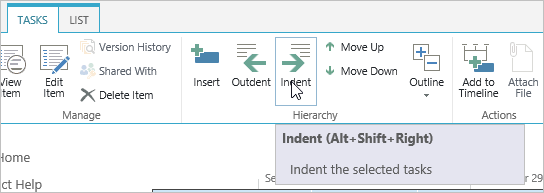
Click Tasks | Indent on the ribbon at the top of your screen. Tip: You can also click Alt+Shift+Right on your keyboard to indent items.
-
Repeat for the Recruit Engineers and Recruit Testers items.
-
Click on the edge of the Recruit Documentation item to select it.
-
Click the Move Down button on the ribbon twice to move the Recruit Documentation item under the Recruit Testers item. Tip: You can also click Shift+Alt+Down on your keyboard to move items down.
-
Select the Recruit Team item and move it to the top of the plan.
Assign Work and Email Report
-
Assign the tasks you created to yourself and to any of your colleagues that may have been added to the system.
To learn about adding users, click here.
-
Add Start and Finish dates to these tasks.
-
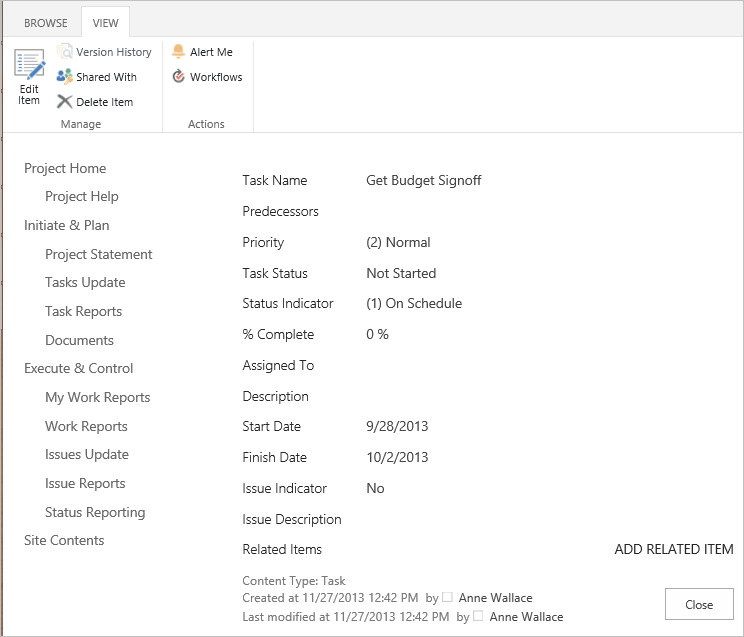
Select Yes from the Issue Indicator field for the Recruit Documentation item. Hit Enter on your keyboard.
-
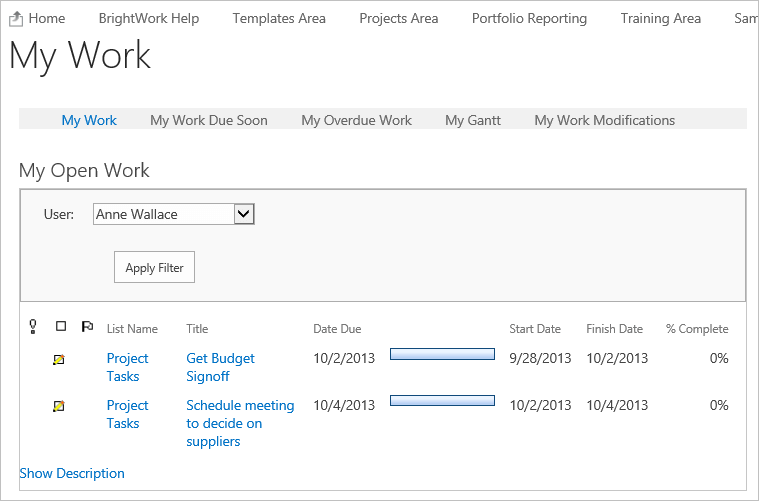
Click Work Reports on the Quick Launch.

-
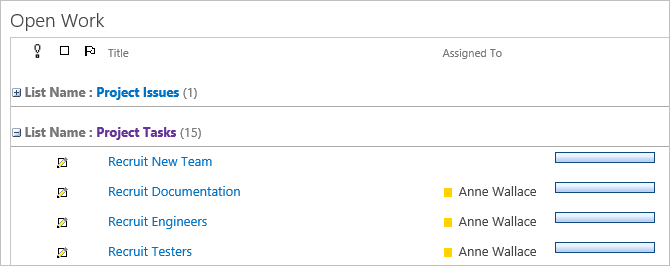
Click the Open Work tab.
-
Expand the Project Tasks grouping – you should see the names you assigned work to in the report.
-
Click on the report title and then the Reporter tab to expose the Reporter Tools ribbon.
-
Click the Email button on the Reporter ribbon and email the report to yourself.

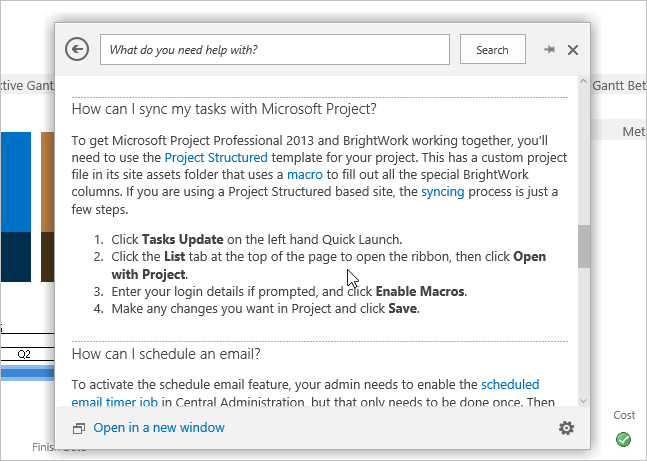
Project Management Note: The ability to email reports on demand (as in this exercise) or to email reports on a pre-determined schedule, is a major aid in collaborating and communicating with Team Members, Stakeholders and Senior Executives. Typical reports that are setup on a weekly schedule include: ‘My Work’ to Team Members; ‘Overdue Work’ to Project Managers; and ‘Project Status Reports’ to Senior Executives. It is possible to setup these emails from the User Interface.To learn more, click here. We will also learn more about this feature in a later guide.
Project Management Note: In an earlier exercise, we easily added and updated many projects to a single list (called the Projects Tracker) in the Project Office. In this exercise we added a new project to the same Project Office by creating a new site. All of these projects now report to the same Project Office (as we will see in the next Exercise). This is a classic example of how customers can start quick with the BrightWork Project Office and evolve as needed and as ready.
Project Management Note: If you need to refresh your memory on certain aspects of BrightWork, or need to get your team members or stakeholders up to speed with BrightWork, you should use the BrightWork Help. The Help is located on the right-hand side of the screen. It contains not only documentation for every feature in BrightWork, but also FAQ’s and videos so you and your organization can quickly master BrightWork and make your projects successful.
5. Effectively Manage Portfolios
Report Across Many Projects
-
Find and click the Business Project Office (PO) by using the “Where Am I?” feature.

-
Explore the various cross-project reports in the Project Office, using the Quick Launch (the links lined up vertically on the left side of the screen), and the tabs (the links lined up horizontally in the middle pane of the project page).

-
Click Issues on the Quick Launch – you will see all issue items from all projects within this part of the organization hierarchy.
-
Expand the sections in the report to find the project you created earlier and see if you can find the task you marked as an issue earlier.
-
Try in-report filtering and sorting by clicking in the column headers.
Project Management Note: Senior Executives need many of the out of box reports that BrightWork provides, as well as the ability to dynamically change these reports on the fly (as seen above).
Project Management Note: These reports are bottom-up, and will include data from child sites (sites that are indented under the Project Office in the hierarchy).
6. Collaborate on Projects
Find My Work
-
Click Business Project Office (PO) on the Quick Launch to return to the Project Office home page.

-
Use the “Where Am I?” feature to find and click into the Project Lite site you created.
Tip!: You may want to hit refresh at the top of the page if you do not see your project. Use the Expand All feature to see the whole site collection.

-
Click My Work Reports – you should see the work items you assigned yourself earlier. This report and other “My” reports will always show the work items assigned to the logged in user.
Project Management Note: The scope of the captured work in these reports is limited to either the specific project site you are clicked into, or if at a roll-up level such as a Project Office, then to the work assigned within the Project Office (e.g., Projects Tracker), and any work assigned within child projects of that Project Office
-
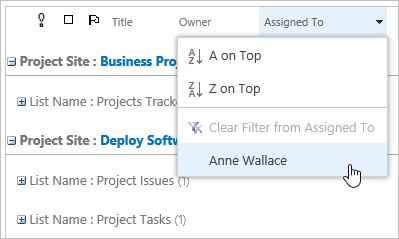
Explore some of these reports; also note that you can select another user from the drop-down menu to see their work and assess how it is progressing. Try this if you assigned a colleague some work in one of the earlier exercises.
-
Hit F5 on your keyboard to refresh the page back to showing your work.
Project Management Note: Team Members can easily find their work on the ‘My Work’ dashboards and this same information is also typically auto-emailed to Team Members on a weekly schedule.
Update My Work
Project Management Note: Team Members need an easy way to collaborate on a project. For example, they need to effortlessly flag issues, quickly update task status, safely edit documents, easily check outstanding work for themselves, and transparently see the overall goals and progress of the project.
-
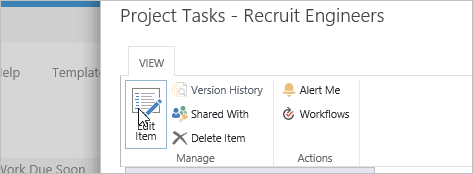
Click the title link on one of the items in your My Work report.
-
Click Edit Item.
-
Select the Issue Indicator checkbox and enter some text in the Issue Description field.
-
Click Save.
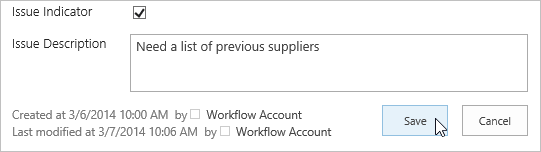
This item will now show up in Issue reports (as you saw in a previous exercise).
Project Management Note: Many of the project templates in BrightWork contain an Issues list for comprehensive management of issues, but they also have this easier way of quickly reporting an issue with a particular work item.
-
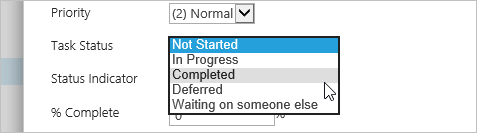
Open another item in the My Work report for editing, select Completed from the Task Status drop down and click Save
-
Click F5 to refresh the report – the items you marked as complete will disappear from the report.
7. Create a Training Project Office
Create Templates
In this section you will create four reusable templates you will use to create your training Project Office Hierarchy. You will use these for the rest of the training guides.
Project Management Note: This specific exercise is geared towards the role of Project Manager.
Note: You should use a naming convention for your templates that will make them easy to distinguish and identify. We recommend using a mix of your initials and the template name, e.g. AW – Project Office (for demo user Anne Wallace).
-
Click Templates Area on the Top Link bar.
-
Click Settings | Create Project Template.
-
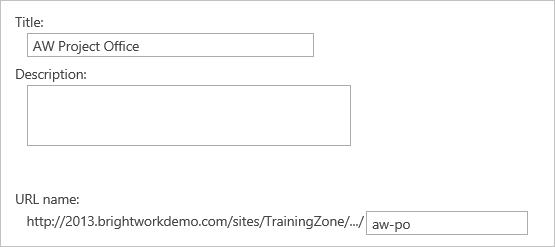
Enter a title that uses your initials and Project Office, e.g. AW – Project Office.
Note: When creating templates, the URL name field is automatically populated based on the Title you enter. -
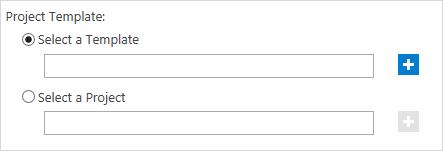
Choose Select a Template and click the Browse button.
-
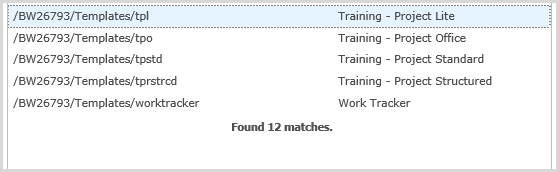
Click Enter on your keyboard to see a list of available templates.
-
Select the Training – Project Office template.
-
Click Create.
-
Wait for the template to be created.
-
Use the navigation to return to the New Project Template form in the Templates Area.
-
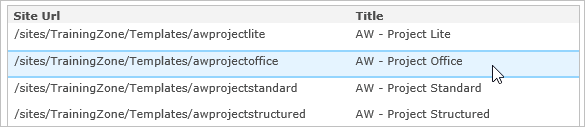
Create copies of the Training – Project Lite, Training – Project Standard and Training – Project Structured templates, using the naming convention specified above.
Project Management Note: Make sure to click the Browse button and select the correct Training template each time you create a copy.
Create Project Office Site
-
Click Training Area on the Top Link bar (click Browse if the Top Link bar is hidden).

-
Click Settings | Create Project.

-
Give your Project Office a Title that you will remember and a URL name. You can use your initials again.
-
Click the Browse button beside Select a Template to open the template site picker.

-
Double-click on the copy of the Training – Project Office template you created.
-
Click Next on next few pages and then click Finish.
Your Project Office will appear shortly.
We recommend that you bookmark your project office (click Ctrl-D on your keyboard).
Create Project Sites
This section will guide you through creating three project child sites in the Project Office site you created earlier, using your training Project Lite, Project Standard, and Project Structured templates.
-
Click Settings | Create Project on the Project Office site you just created.
-
Name the project ‘Hardware Upgrade’.
-
Enter a description, and the URL name field is automatically populated based on the Title you enter.
-
Enter your name in the Project Manager field and click Enter on your keyboard. Click Next to go to step #2 in Create Project process.
-
Click Browse and select the Training – Project Lite template you created – the one with your initials and click Next.
-
Click Next on the next few pages by accepting defaults on those pages. Lastly, click Finish to complete the process.
-
Repeat the above steps to create a new project “Hyper-V Deployment” using the Training – Project Standard Template you created.
-
Repeat the above steps to create a new project “Hardware Upgrade Global” using the Training – Project Structured Template you created.
Looking for templates on Microsoft 365?
BrightWork 365 lets you plan, manage, and collaborate in Microsoft 365.