Project Manager
This guide is aimed mainly at Project Managers who will be using BrightWork to manage projects; however, any member of the organization who will be using BrightWork extensively, or who will be customizing and configuring BrightWork, should also complete this training.
1. Training Introduction
Note: We recommend completing the Create a BrightWork Training Project Office training in the Introductory Guide before starting this guide.
Prerequisites
You will need to have your own Training Project Office created with your own versions of the BrightWork training templates. For more information, please see the Create a BrightWork Training Project Office guide in the Introductory Guide.
Suggested Exercises
At the end of many chapters you will see some Suggested Exercises that you should be able to complete on your own, based on what you have just done.
These suggested exercises will not contain any steps – you will need to apply what you have learned to do the exercise. We strongly recommend you complete these suggested exercises, as they will help to reinforce what you have just learned.
System Requirements
BrightWork has the same system requirements as SharePoint. One of the exercises in this guide requires Microsoft Project Professional.
2. BrightWork Templates Overview
In this chapter, you will get a high-level overview of BrightWork project management templates.
About the BrightWork Templates
In BrightWork, a template is essentially a customized SharePoint site that you copy when creating a project site or another template.
BrightWork ships with the templates depicted in the Project and Portfolio Management Spectrum diagram below. What defines the location of a template on the spectrum is the amount of ‘project management’ in the template; generally, this is determined by the number of lists in the template and the complexity of those lists.
The training exercises in this guide use several of the templates highlighted in the spectrum diagram. These training exercises are to be performed in the Training Area.
Note: To make your training more realistic, most of the templates you will use will contain some sample data.
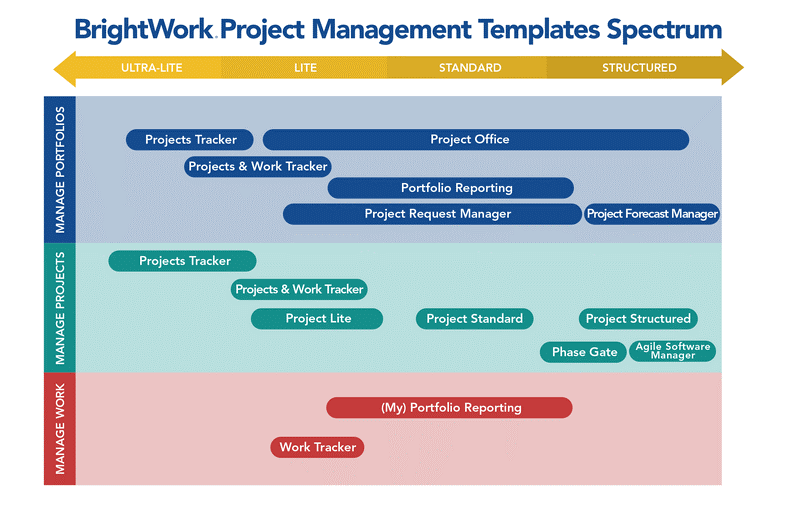
See the Templates Overview BrightWork help topic for more information about the BrightWork Templates.
3. Projects Tracker: High-Level Management
In this exercise, you will use the BrightWork Projects Tracker list to manage a number of projects at a very high-level.
Overview
As you will see in later exercises, the majority of BrightWork templates take a ‘site per project’ approach. However, the Projects Tracker in the Project Office solves the need to manage multiple small projects in one place. These projects will not have a detailed project plan, resources or budgets, but are large enough to be tracked.
Note: Many BrightWork customers use the Projects Tracker first, as it enables them to get up and running with BrightWork as early as possible in their deployment.
-
Navigate to the Project Office site created using the ‘Create a BrightWork Training Office’ guide. It should be named: ‘Project Office’. See Introductory Guide.
-
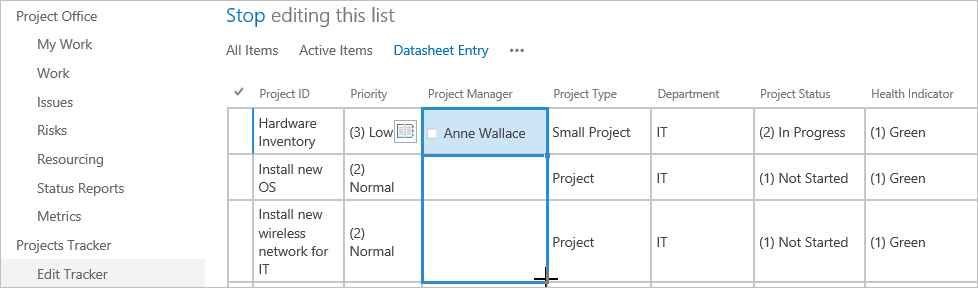
Click Edit Tracker on the Quick Launch.
-
Make some changes to the displayed projects (e.g. make yourself the project manager, scroll out to the right and change some of the indicators) and add one or two new projects.
-
Click Projects Office on the Quick Launch to see your changes.
-
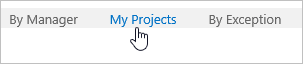
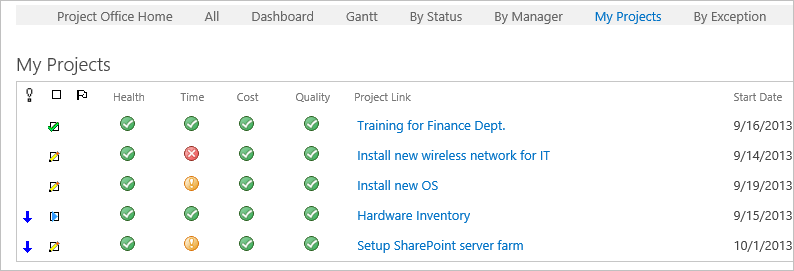
Click the other tabs to explore the available reporting dashboards.
You should see the projects of which you just made yourself manager.

Suggested Exercise
Add a project to the Projects Tracker.
4. Project Lite: Manage a Small Project
In reality, it is likely that you will want to take the ‘site per project’ approach for many of your projects. This does not mean that you necessarily have to follow a complex or advanced project management methodology; the Project Lite template offers a very small amount of project management for those situations that call for it.
In this exercise, you will update manual metrics and assign some work to a project created with the Project Lite template. You will explore the inbuilt reports that assist you with tracking the project’s progress. You will also upload a document and open it for editing.
Overview
As you will see in later exercises, the majority of BrightWork templates take a ‘site per project’ approach. However, the Projects Tracker in the Project Office solves the need to manage multiple small projects in one place. These projects will not have a detailed project plan, resources or budgets, but are large enough to be tracked.
Note: Many BrightWork customers use the Projects Tracker first, as it enables them to get up and running with BrightWork as early as possible in their deployment.
-
Navigate to the Project Office site created using the ‘Create a BrightWork Training Office’ guide. It should be named: ‘Project Office’. See Introductory Guide.
-
Click Edit Tracker on the Quick Launch.
-
Make some changes to the displayed projects (e.g. make yourself the project manager, scroll out to the right and change some of the indicators) and add one or two new projects.

-
Click Projects Office on the Quick Launch to see your changes.
-
Click the other tabs to explore the available reporting dashboards.

You should see the projects of which you just made yourself manager.
Suggested Exercise
Add a project to the Projects Tracker.
4. Project Lite: Manage a Small Project
In reality, it is likely that you will want to take the ‘site per project’ approach for many of your projects. This does not mean that you necessarily have to follow a complex or advanced project management methodology; the Project Lite template offers a very small amount of project management for those situations that call for it.
In this exercise, you will update manual metrics and assign some work to a project created with the Project Lite template. You will explore the inbuilt reports that assist you with tracking the project’s progress. You will also upload a document and open it for editing.
Define Project
In the Project Lite template, some high-level project details are maintained in the Project ribbon group at the top of the project page. Note that the following date values can also be updated using the corresponding date tile on the project home page.
-
Navigate to the Hardware Upgrade project you created in the Create a Training Project Office section of the Introductory Guide.
-
Click the Project ribbon tab, and click View Project Statement. The Project Statement is where you can store high-level information about the project, similar to what you might find in a Project Charter.
-
View the different fields in the Project Statement, update the data as desired, and save your changes.
-
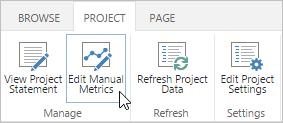
Click the Project ribbon tab, and click Edit Manual Metrics.
-
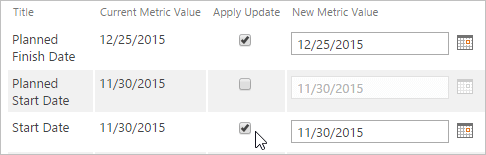
Change the Start Date to today and the Planned Finish Date to a date in the future, then click Update.
Manage Tasks and Assign Work
Once you assign work to team members, it will be easier for them to remember these tasks. It also makes life easier for them, as keeping their work items up to date is all the status reporting they will have to do.
The SharePoint Tasks list includes some very useful features that allow you to structure and organize the tasks into a hierarchy (out-dented parent summary tasks, and indented child tasks) that makes sense to you. You can also add or close tasks directly from this list. You will exercise these features next.
-
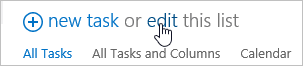
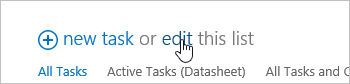
Click the Add Tasks tile.
-
Click edit this list.
-
Assign some of the items to yourself.
-
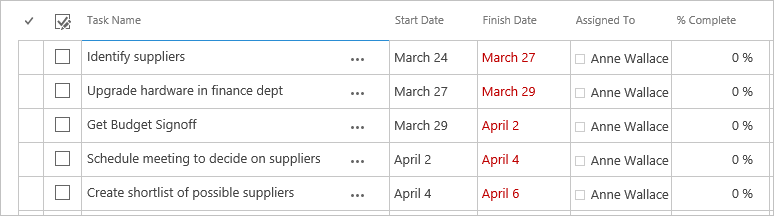
Scroll down to the bottom of the Datasheet and enter a new task e.g. Suppliers and click Enter on your keyboard.
-
Select each item referring to ‘suppliers’ and click Tasks | Move Down until they each sit under the newly created task.
Note: You can also click Alt+Shift+Down on your keyboard to move items down.
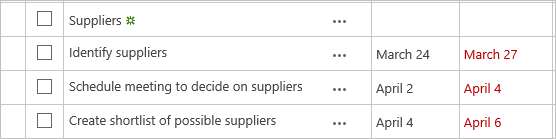
-
Select each item under the new ‘Suppliers’ task and click Tasks | Indent.
Note: You can also click Alt+Shift+Right on your keyboard to indent items. -
Set the % Complete of the ‘Identify Suppliers’ task to 100, marking it as complete.
-
Click Stop editing this list.
-
Click Project Home to return to the Project home page.
Track Project Progress
No matter what size project you’re working on, knowing what is going on in the project is key to its success.
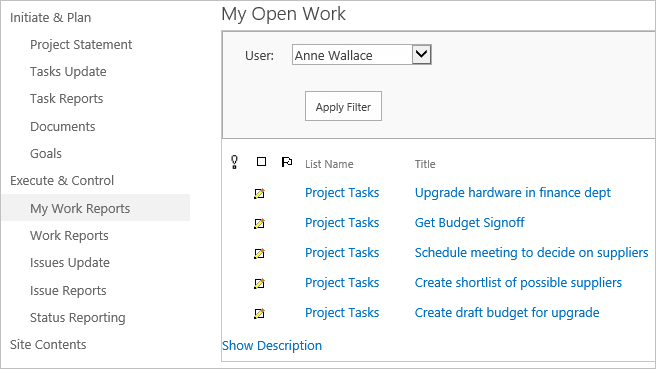
Click My Work Reports on the Quick Launch. You will see a report that details the items you assigned to yourself earlier. This is where Team Members go to find out what they have to do in the project. You can select other team member names from the drop-down menu to assess how they are getting on with their work.
Click Project Home and click Work Gantt on the tabs. This report shows all the work items in the project.

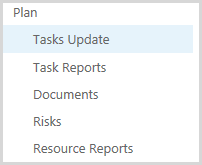
List Boards are also an excellent way to quickly visualize the status of your team’s work. On the Project’s Quick Launch click Task Reports to display the Tasks Board list board.
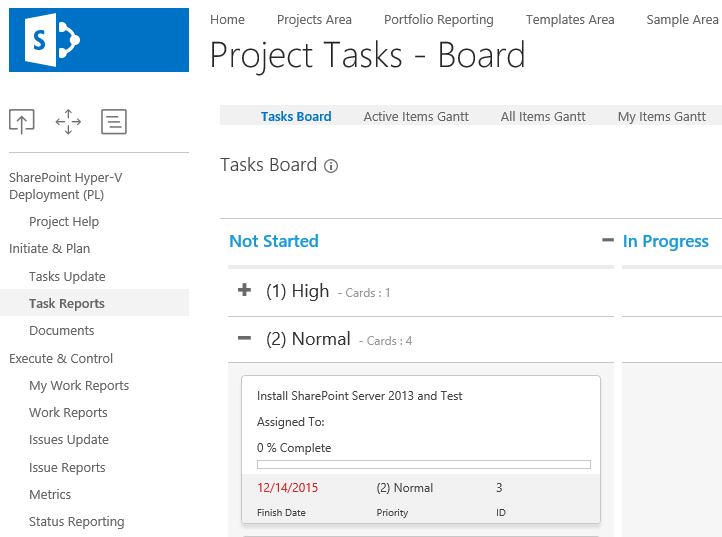
For more information, see the List Board View Web Part section of BrightWork Help.
Manage Documents
If you know one thing about SharePoint, it will probably be that SharePoint is great for managing documents, especially Microsoft Office documents.
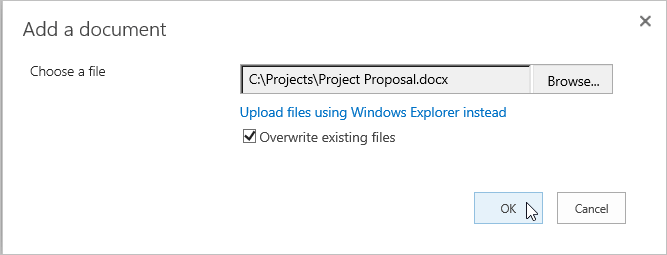
Upload a Document
-
Click Documents on the Quick Launch.
-
Click new document.

-
Click Browse and select a Microsoft Office Document from your computer (ideally, a Word doc).
-
Click OK.
Open Document in Office Client
-
Click Edit on the item menu of the document you just added.
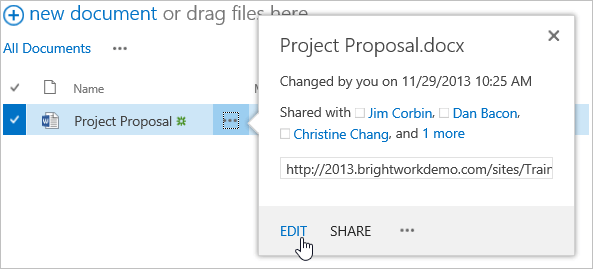
The document will open in the appropriate Microsoft Office client. Make some changes, and save and close the document.
Suggested Exercise
-
Use the Tasks list to mark some of the items you assigned yourself as complete.
-
Assign work tasks to your colleague team members who will be completing the Team Member training guide. If you are an on-premises customer, please ask your SharePoint administrator how to add additional users to the BrightWork application. If you are using BrightWork Online, you can add additional users from the Manage User Accounts tab found in the Top link bar at the top of your screen.
5. Project Standard: Manage a Medium Sized Project
Some projects just require a little more process than is offered by the Project Lite template, however this does not have to mean a fully structured methodology is called for. The Project Standard template provides a semi-structured process that is useful for a range of business departments to run their projects including sales, marketing, engineering, finance, etc.
In this exercise, you will manage some project issues, learn how to schedule tasks, and update the inbuilt Project Metrics in a project site with a Project Standard template. You will also create a dynamic Project Status Report.
Using this Template
This template contains similar features to the Project Lite template, for instance, there is a Project Statement, Documents library and a Tasks list. For this exercise, find the Hyper-V Project you created during the Create a Training Project Office in the Introductory Guide.
Note: The amount of project management in a BrightWork project template can generally be gauged by the number of links on the Quick Launch. The Project Standard template has more links to functionality like lists and reports than the Project Lite template.
Manage Issues
BrightWork templates generally offer two types of Issue Management. You can create standalone Issues, using the Issues list, or you can mark an ordinary work item as an Issue. Both methods lead the items to appear in Issue reports in the project and in the Project Office that contains the project.
Mark an Item as an Issue
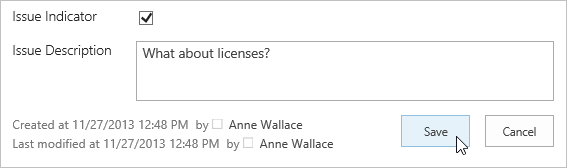
To mark a task as an Issue:
-
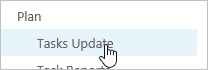
Click Tasks Update on the Quick Launch and select Edit Item from the menu of one of the tasks.
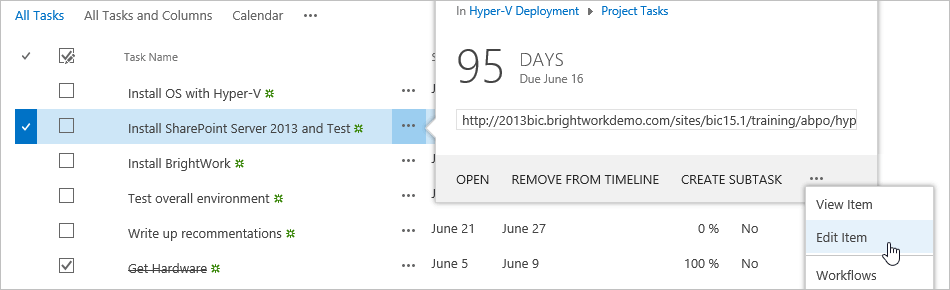
-
Assign the task to yourself.
-
Select the Issue Indicator checkbox, enter an Issue Description and click Save.
Create an Issue Item
Selecting the Issue Indicator checkbox only means that the item will appear in Issue reports – it does not actually create an item in the Issues list.
To create an Issue item in the Issues list:
-
Click Issues Update on the Quick Launch.
-
Click new item.

-
Fill out form with some fictional issue details and assign it to yourself.
-
Click Save.
-
Click Project Home on the Quick Launch – the two issues you added should be visible in the Top Open Issues web part.
Task Scheduling
How to Schedule Tasks
BrightWork makes it easy to schedule tasks. In this exercise you will calculate the schedule for a number of existing tasks starting from today’s date.
-
In your Hyper-V project site, Tasks Update on the Quick Launch. There should be several tasks already set up.
-
Click edit this list.
-
Set the % Complete for all the task items to 0%
-
Click the first task and set the Start Date to today’s date, ensure there is a Duration of at least one day, and hit the return key.
-
Click the second task, land in the Predecessor Column, use the drop-down arrow to choose the name of the task immediately preceding it as a predecessor. Do the same for all of the subsequent tasks, setting the predecessor for each one to the task immediately above it. Now all of these tasks are linked to one another.
-
Set the duration of each subsequent task to a few days length each.
-
Ensure all of the % Complete for tasks are set to 0%.
-
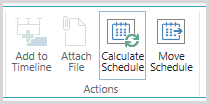
Click Tasks on the ribbon, Calculate Schedule and click OK.
You will notice that the start and finish dates have been updated.
Tip: To see your tasks in a Gantt chart click Task Reports on the Quick Launch.
Create a Summary Task
In this exercise, we are going to create a summary task that summarizes the three Upgrade Hardware items at the end of the list.
-
While still in edit mode in the Task list, click into the Task Name column of the empty row at the bottom of the list, and add title “Summary Task”.
-
In the row under this new summary task, add two additional tasks (you can name them simply Task 1 and Task 2), and add a start and finish date for Task 1.
-
In the Predecessor column of Task 2, choose Task 1.
-
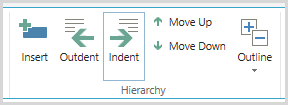
Click on the left-most column of Task 1 and Task 2 to highlight each of the rows.
-
Move your mouse to the Ribbon at the top of the screen, click on the Tasks tab, and then the Indent button in the Hierarchy group. Notice how Task 1 and Task 2 are now child tasks of Summary Task.
-
Move your mouse to the Ribbon at the top of the screen, click on the Tasks tab, and then the Calculate Schedule button in the Hierarchy group. Notice how the Duration, Start Date, and Finish Date for the Summary Task have automatically adjusted based on the values of the child tasks.
Create Status Report
The status report list includes a built-in workflow that captures a snapshot of the project and metrics for historical purposes. The Status report also feeds details to the Metrics list, which you will learn about in the next section.
A Project Manager may be asked to create such a report once a week.
-
Click Status Reporting on the Quick Launch.
-
Click new item.
-
Fill out the form and click Save to create a status report.


Update Project Metrics
A metric is an analytical measurement intended to quantify the state of a system; for example, population is a metric. Metrics matter because they enable planners to make decisions based on empirical data.
Project metrics are important because they give you and the other project stakeholders an easy, objective and scientific way of measuring the progress of the project. They also provide data with which to make important decisions as to the direction and scope of the project.
In BrightWork, the Metrics list queries other lists and BrightWork Reports, to generate important project metrics like % Complete, Planned Finish Date, Project Health and so on. Metrics can also be manually maintained.
In the previous exercise, you updated the dates in the Tasks list. You also just updated the % Complete when you created a Status report. This data is used by the Metrics list, but it is likely that this data is not yet reflected in the Gantt on the project home page. The Metrics list is typically set to refresh every night, but you can manually refresh it on-demand to ensure that the information is up-to-date.

To update the Metrics list:
-
On the project home page, click Project on the Ribbon.
-
Click Refresh Project Data, then click OK.
-
Click Project Home on the Quick Launch to navigate back to the project home page and you will notice Gantt has updated.
Suggested Exercise
-
Assign some tasks to yourself.
-
Navigate to the help topic on Configure Task Scheduling to learn how to extend task scheduling capabilities.
6. Project Structured: Manage a Large Project
In this exercise, you will populate a project site created with your training Project Structured template with data from a BrightWork-supplied Microsoft Project file. You will see how the template is used to create this site facilitates extra data sharing between Microsoft Project and SharePoint.
Overview
Some projects and some project managers just love and need Microsoft Project. Not only that, many project managers need more process in their larger projects than they would typically need in a smaller project.
The Project Structured template provides a fully structured project management environment, with full Microsoft Project syncing.
Note: If you do not plan to use Microsoft Project Professional to manage projects, you can skip this chapter.
You need to have Microsoft Project Professional (not the Standard version) installed to complete this section.
Sync in the Work Breakdown Structure (WBS) with Microsoft Project
The supplied Microsoft Project file includes a macro that automatically links the file and the Project Task list in the site. It also takes care of the first sync and facilitates extra column mapping between SharePoint and Microsoft Project. This Microsoft Project file is stored in the Site Assets Library of the project site.
To sync in the Work Breakdown Structure (WBS):
-
Navigate to the Project Structured site you created in the ‘Create a Training Project Office’ section of the Introductory Guide. It should be named: ‘Hardware Upgrade Global’.
-
Click the add tasks tile.
-
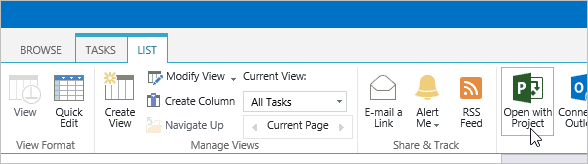
Click List | Open with Project.
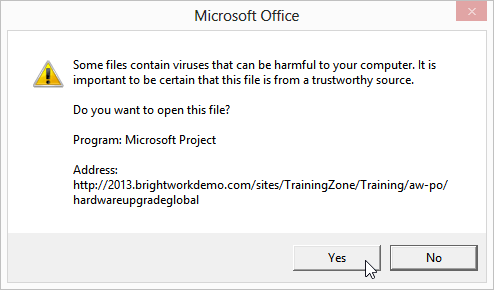
-
Click Yes in the security dialog.
-
If asked, enter your Username and Password and click OK.
-
Click Enable Macros.
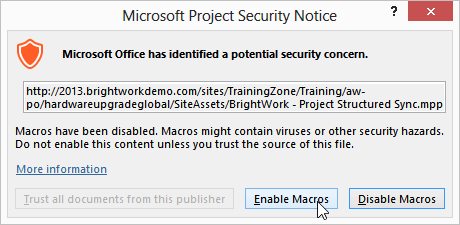
Note: The BrightWork macro facilitates easier setup and syncing. It ensures the Project Tasks list connects to the custom Microsoft Project file and takes care of the extra column mapping between SharePoint and Microsoft Project.
If you do not enable the macro, you will need to manually establish the link between SharePoint and the Microsoft Project file, using the File | Save and Sync Your Project page to set the SharePoint URL.
Please see the About the Project Structured Macro BrightWork help topic for more information.
-
Click Save in MS Project to initiate a sync with the BrightWork project site and populate the Task list.
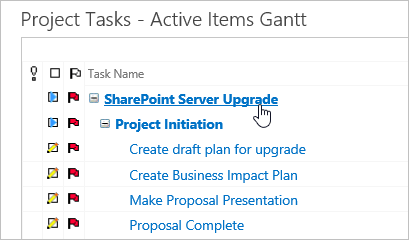
-
Return to the project site in SharePoint and click Task Reports on the Quick Launch, and then the Active Items Gantt tab in center pane of the page. Note how the task items got pulled into BrightWork when you synced the plan.
-
At the bottom of the MS Project plan (in the MS Project app) add three new child tasks named Identifying Suppliers, Create draft budget for upgrade, and Update Migration Plan and Risk Plans.
-
In the Predecessor column of each of the new child tasks, add the name of the immediately preceding task.
-
Click the Save button to save the changes to the MPP file and to initiate a sync back to the BrightWork Tasks list.
Move Project
Many projects, although all different, will have a lot in common. You can reuse the project plan, however the plan will likely be out of date when reused, so every item will have a late flag. This is likely true in this exercise as well.
In this exercise you will move the entire project forward in time.
-
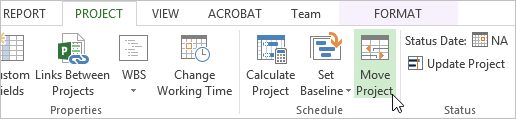
Return to Microsoft Project and click Project | Move Project.
-
Set the New project start date to a few days before today’s date.
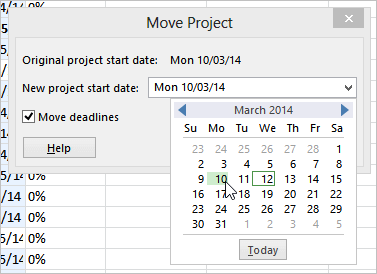
-
Click OK.
-
Click Ctrl-S to save and sync the changes back to SharePoint.
Note: With Project and SharePoint, every time you click Save or Ctrl-S, the plan will be synced to SharePoint. If you want to do some ‘what if analysis’, you will have to remember not to save, or else everyone will see your updates. -
Now return to SharePoint, on the Tasks Gantt page, and refresh the page. The tasks will have picked up the new dates.
Assign Work Items
-
Return to the Microsoft Project plan and assign all of the tasks to yourself. Because you have linked the plan and the SharePoint Tasks list, your name should be available in the Resource drop-down.
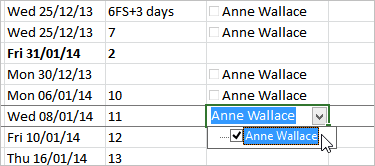
-
Save the plan again to sync the changes to SharePoint.
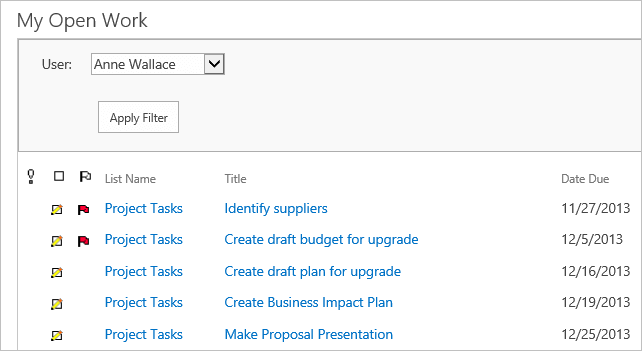
-
Return to the project and click My Work Reports on the Quick Launch. You will see the items assigned to you in the My Open Work web part.
Manage Project Costs
Many projects require that resource costs be tracked and managed (especially external resources). Microsoft Project includes the ability to assign costs to resources and to estimate the current costs of the project using this data. The BrightWork Project Structured template includes placeholder columns to capture this data.
-
Click Tasks Reports on the Quick Launch.
-
Click Active Items Gantt tab
-
Click the top summary item link in the plan (the summary title may be different for you).
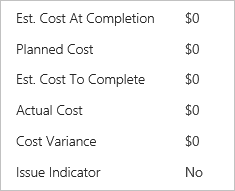
Note how there is no cost data in this item.
-
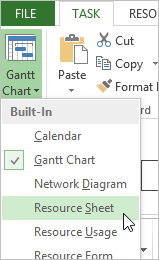
Return to the Microsoft Project plan, click the Task tab and select Resource Sheet from the View menu.
-
Enter some costs – you should be the only resource visible (unless you have added other resources).

-
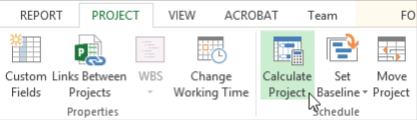
Click Project | Calculate Project to refresh the custom columns in Microsoft Project.
-
Save the plan to sync the changes to SharePoint.
The cost columns in the top summary item will show the total cost of assigned items based on the cost of the resource assigned to those items and the amount of time it will take to compete the items. The individual assigned items will also include costs.

Create Baseline
Once you have your Microsoft Project plan finalized, you should create a baseline in Microsoft Project. This enables you to track details like Planned Start; Planned Work, Variances etc.
Baselines are used to capture a snapshot of the initial plan and then again at agreed checkpoints. They can be used as the primary reference point against which you measure change and variance in the project. The BrightWork Project Structured template and supplied Project MPP file include extra columns to enable capturing and reporting of the baseline in SharePoint.
To create and capture a baseline:
-
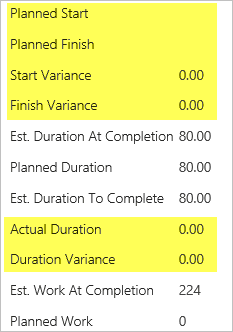
Return to the top summary item in SharePoint.Note how the columns that reference the baseline have no data in them (some examples are highlighted in yellow below).
-
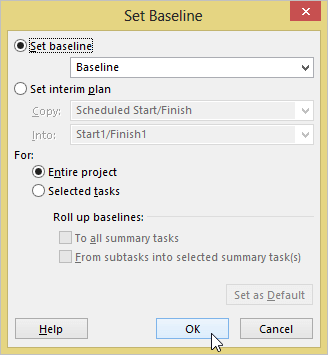
Return to Microsoft Project and click Project | Set Baseline.
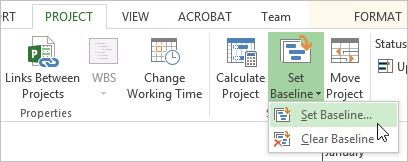
-
Click OK.
-
Click Calculate Project to refresh the custom columns in Microsoft Project.
-
Save the plan to sync the changes to SharePoint.
-
Return to SharePoint and refresh the main project item: you will see baseline data in it – see below for an example before and after state. If you open any task or summary item you will also see the baseline data pertaining to it has been added to the item.
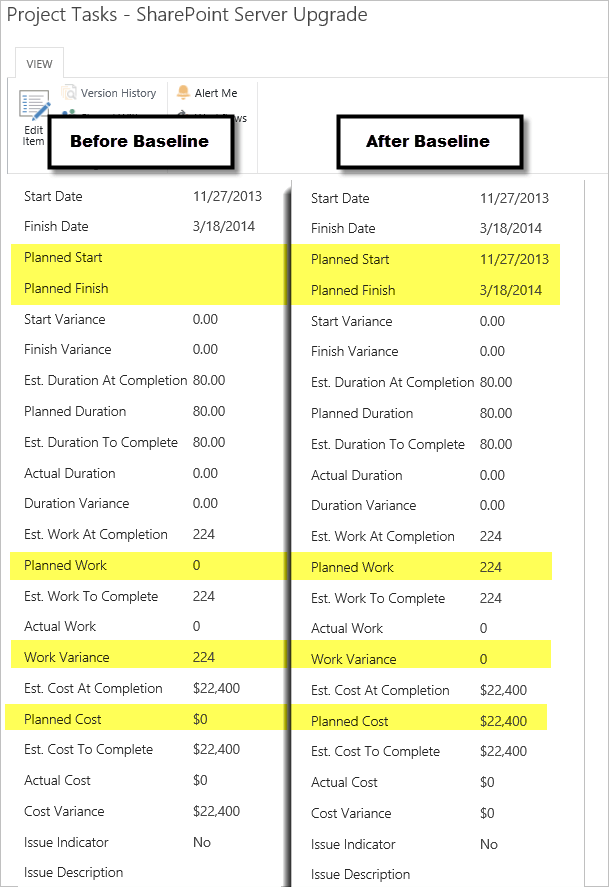
Note: The Duration Variance and Work Variance columns have reverted to zero because the project has not yet varied from the state set in the baseline. If everything in the project goes exactly to plan, these columns will stay at zero. The values in these columns are auto-calculated in Project and written to SharePoint. For that reason, you should not attempt to edit the values in these extra columns in either Project or SharePoint.
Manage the Project
Once you have the project up and running, your main task will be to monitor the project and make adjustments as needed.
Run a Metrics Update
-
Click Project Home on the Quick Launch. Note how reports on the home page contain no data as of yet, although it is possible that the automatic project refresh ran in the background by the time you landed back on the home page, and therefore data may actually be present.
-
Click Project on the Ribbon.
-
Click Refresh Project Data, then click OK.

When the page is refreshed, the report will show project data
Note: For more information about metrics in BrightWork, please refer to the BrightWork Project Metrics Training Guide.
Update Tasks Based on Progress
The great thing about the Microsoft Project to SharePoint sync is that it introduces collaborative project management to Microsoft Project users. In SharePoint, team members are able to maintain the information in their assigned work items and this information automatically feeds back to Project via the sync. This means you no longer have to chase team members to find out what is complete, and what is nearly complete, and they benefit as they are no longer asked to prepare reports on the status of their assigned work.
In this exercise, you will update some work items and mark them as complete.
To update tasks:
-
Click Task Reports on the Quick Launch and click the Identifying Suppliers task item.
-
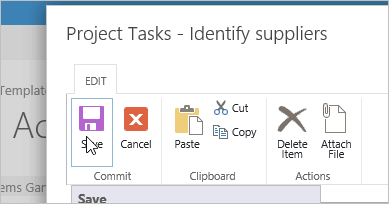
Click Edit Item and change the % Complete to 100.
-
Click Save.
-
Repeat for the next item.
-
Return to the project plan in Microsoft Project and click Save again to sync.You will see that the items get updated in the plan with the changes you made in SharePoint.
-
Switch back to SharePoint and refresh the Gantt view. The completed items will disappear (as this view only shows active items) and the % Complete of the project will update.

-
Run another Metric Update to see the changes reflected in the Project Gantt on the project home page.
Re-plan in SharePoint
As a project manager, you will probably prefer to do your re-planning in Microsoft Project; however, occasionally you may need to do some re-planning in SharePoint.
-
Click Tasks Update on the Quick Launch.
-
Click edit this list.
-
Scroll down and right-click on the Update Migration Plan and Risk Plans item and click Insert.
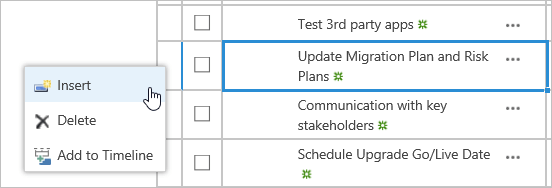
-
Enter ‘Implementation – Iteration 2’.
-
Click Shift-Alt and the left arrow on your keyboard to out dent the item and make it a summary item.
-
Scroll up and click stop editing this list.
Note: See here for more information on indenting, out-denting, moving and deleting tasks. The important thing to realize about re-planning in SharePoint is that for changes that affect other items to be realized, you have to open the plan in Project and sync it, as SharePoint cannot do any recalculation – this can only be done in Project.
Suggested Exercise
Create a new Structured project site and sync it with the included Microsoft Project file, filling out the project data to reflect your own management needs.
7. Manage Across Projects
In this exercise, you will explore how BrightWork can help you gain oversight over multiple projects, find projects in trouble, identify escalated project issues and find your work across multiple projects.
Overview
In the prior exercises, you have seen how it is possible to setup sites in SharePoint to manage different project types. But what if you are responsible for more than one project?
The Project Office template is for situations where you want to report on key items (e.g. project status, tasks, issues, risks, milestones, deliverables, etc.) from multiple projects. The Project Office template includes collections of cross-project reporting dashboards (Projects, My Work, Work, Issues and Resourcing) that roll up data from the sites that exist under the Project Office.
Monitor Many Projects
-
Use the Navigation controls on the Quick Launch to navigate to your training Project Office.
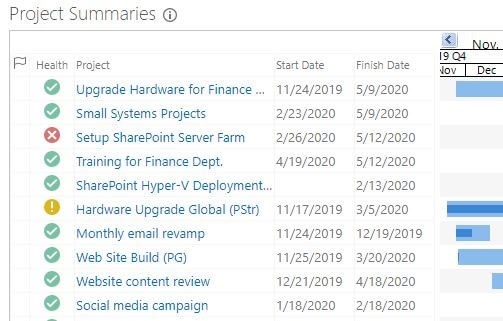
Note how there are multiple projects on the Project Summaries Gantt. Some are from the Projects Tracker list that is built into the Project Office itself, and the others are from the project sites you created in the previous exercises.
-
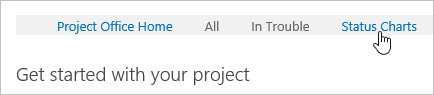
Click Status Charts on the Tabs bar.
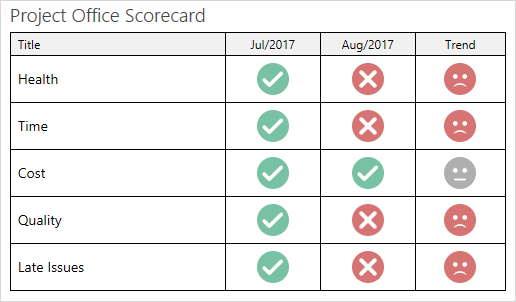
Note the Project Office Scorecard shows the history of multiple Project Office Metrics. It also shows a trend icon that indicates if a metric has recently changed for better or worse.
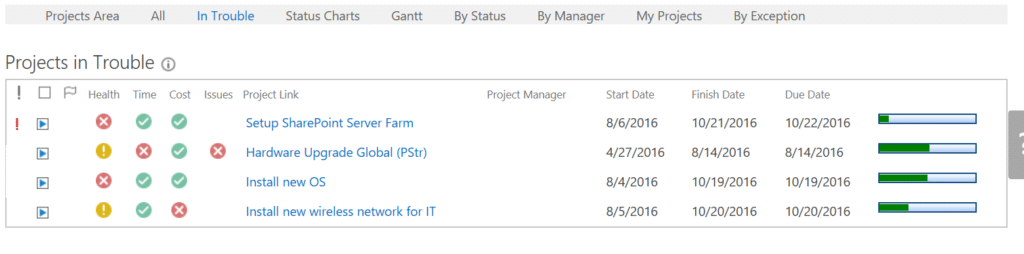
Find Projects in Trouble
Looking at the Project Summaries report on the Project Office home page, it appears that overall, the general health of all projects is fine; however, some projects are late, and others are in danger of being late. If you wanted, you could drill down into the projects to find out what is causing these issues, or you could contact the various project managers directly and ask them what is going on.
Find Escalated Issues
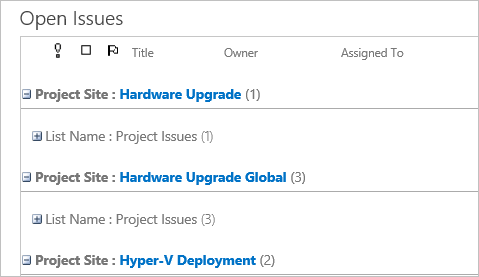
Click Issues on the Quick Launch. You will see a report showing all the issues in the sites under the Project Office, including some you created yourself earlier.
Find your Work
Click My Work on the Quick Launch (the series of links aligned vertically on the left side of the screen). You will see all the work items assigned to you across all the projects under the Project Office.
Resource Usage Reporting
An important element of reporting across your portfolio of projects is resource reporting. Resource usage reports display how much work has been assigned and allocated in a configurable calendar-like view. Configuration options include setting thresholds for indicating when resources are over-allocated, and grouping to show totals for specified resources. Note that resource reporting can also be configured at the individual project site level as well. You will find examples of resource reports in several different templates, including Project Office, Project Standard, and Project Structured.

For additional information see the Resource Usage Reports topic in BrightWork Help.
Suggested Exercise
Find and close one of the Issues you created earlier.
8. Update Project Reporting
In this exercise, you will get a taste of the many configuration options that are available with BrightWork, by first creating a personal report, and then adding a filter to a shared report.
As BrightWork is built on SharePoint, the full range of standard SharePoint configuration options are available, as well as many extra BrightWork options. This section will give some very simple yet powerful examples of BrightWork configuration options.
Create a Personal Report
As you have just seen, BrightWork includes a large number of reports that enable you to get a good understanding of what is going on in all projects in your organization.
BrightWork also allows you to create a personal report that suits your specific needs better (the personalized formatting of this personal report will only be visible by you). You can toggle back to the default shared report as necessary.
-
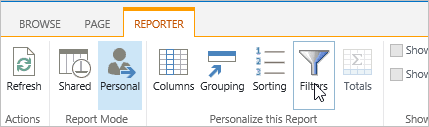
Click the Project Summaries report header on your Project Office home page.

Note: Clicking the report header is how to make the Reporter Tools ribbon appear for a BrightWork report.
-
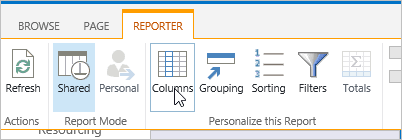
Click the Reporter tab.
-
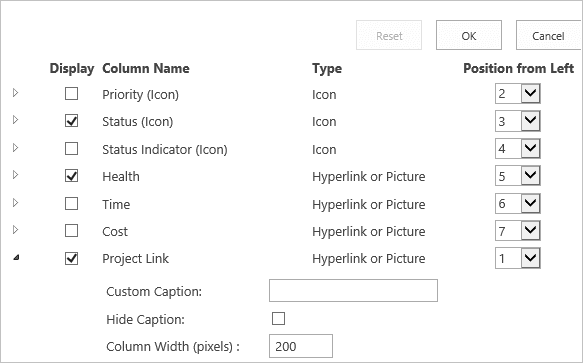
Click the Columns button in the Personalize this Report section.
-
Deselect Priority (Icon), Status Indicator (Icon), Time and Cost.
-
Select 1 from the Position from Left menu for the Project Link column and change the column width to 200 and click OK.
The personal report should now look something like the report below.
-
Click the Filters button.
-
While keeping the existing filter entries, click on the green plus sign to add an additional filter, and select Finish Date, and is less than or equal to, and enter [Today] +30.
Note the Alert under Valid? This indicates that there is something wrong with the syntax in the filter.

-
Mouse over the Alert symbol to get a possible explanation.As you can probably see, the comparison value should be [Today + 30].
-
Enter [Today+30] in the Comparison Value field.
-
Click OK.
Now you should have a personal report that focuses on projects due to finish in the next 30 days!
Toggle between a Personal and Shared Report
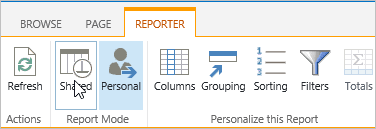
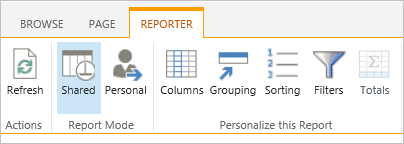
It is very important to remember that the personal report is the report that will load first whenever you visit the page. There will be no indication of this when you land on the page. The only way to tell if a report is actually a Personal one, is to expose the Reporter Tools ribbon.
If the displayed report is a personal one, the Personal button will be highlighted. Click the Shared button to toggle back to the original shared version.
Reset a Personal Report
You can easily reset a personal report back to its default shared state by clearing your personal settings.
-
Click Columns in the Personalize this Report section.
-
Click Reset.
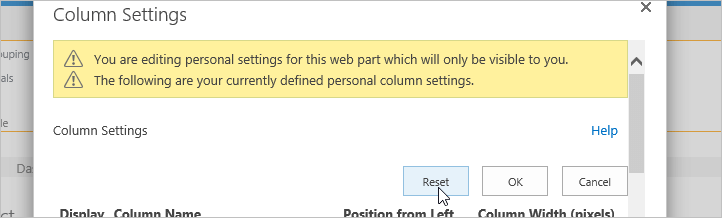
-
Click OK to confirm.
-
Click the Filters button in the Personalize this Report section.
-
Click the Reset button.Click OK to confirm and the report will now default back to the Shared version.
Configure Shared Report
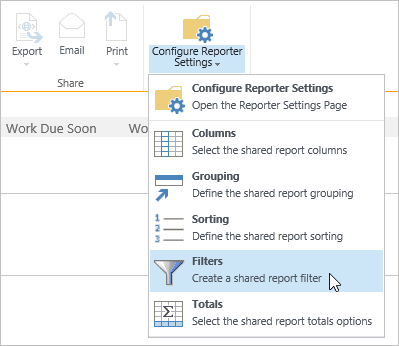
In the previous section, you created a personal report. Next, you will configure the shared report that all users will see. Technically speaking, all the options that you exercised when creating the personal report are available when editing the shared report. In this section, we will again explore the report filter.
Note: This option to change a Shared Report is only available to users with elevated privileges.
To create a report filter:
-
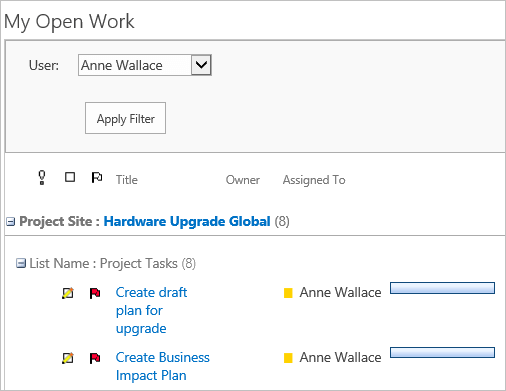
Navigate to your Project Office home page and click Work on the Quick Launch.
-
Click the Open Work tab.If you have completed all the exercises in this guide, the report will display a mix of list types: Project Issues, Project Tasks, Project Risks, and Project Goals. Let us imagine you don’t want Project Risks and Project Goals displayed at this level.
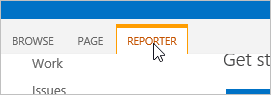
-
Click on the report header to make the Reporter ribbon visible.
-
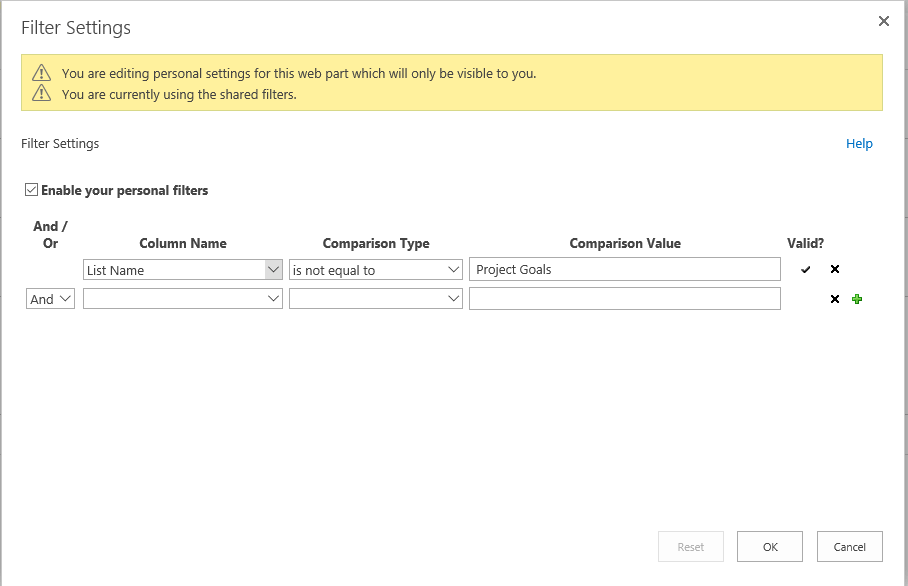
Click Filters on the Configure Reporter Settings menu to open the Filter Settings editor.
-
Select List Name from the Column Name menu.
-
Select is not equal to from the Comparison Type menu.
-
Enter Project Goals in the Comparison.
-
Click the Green plus icon on the right to add another filter and create a similar filter for the Project Risks list.
-
Click OK.
Suggested Exercise
Create a personal report based on your own reporting needs.
9. Share Reports
BrightWork reports can be shared in various ways; reports can be printed, emailed and exported.
In this section, you will learn how to email a report, and how to set up an Excel report refreshed from a web query.
Email a Report
You may need to contact a team member regarding their My Work report or you may need to send information higher up the chain.
Note: Reports can only be emailed to email addresses that exist in the active directory or list of users added to the site collection.
-
Click Work on your Project Office Quick Launch.
-
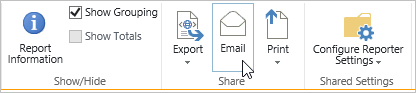
Click in the Work Due Soon report header to activate the Reporter Tools ribbon.
-
Click Reporter | Email.
-
Click the Browse button.

-
Enter the first letter of your name and click Enter on your keyboard.
-
Double-click on your name and click OK.

-
Enter a Subject and a message.
-
Click Send.
Note: As well as being able to email report on demand, you can also setup reports to email on a schedule (e.g. every Monday morning). You can even set reports with user filters (e.g. My Work) to email each user about their assigned items. We recommend that Scheduled Emails are only sent at the Project Area level and not from individual projects. Users will pay more attention to a single email; furthermore, this method prevents users from receiving multiple emails about the same items. See the Create Scheduled Report Email BrightWork help topic for more details on creating scheduled report emails.
Print a Report
Need to rush to a meeting without your laptop? Just print the relevant report.
-
Click in the Work Due Soon report header to activate the Reporter Tools ribbon.
-
Click the Print button in the Share section of the Reporter Tools ribbon.
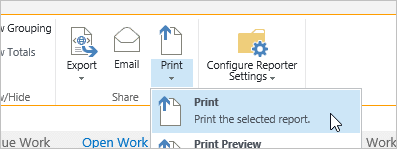
-
Ensure you have the correct printer selected and click Print.
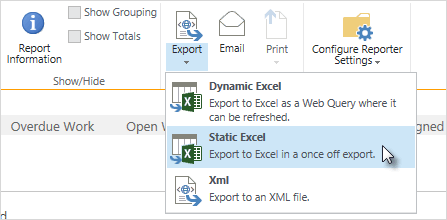
Export a Report to Static Excel
Many managers live and breathe with Microsoft Excel. Fortunately, you can export BrightWork reports to Static Excel.
-
Click in the Work Due Soon report header to activate the Reporter Tools ribbon.
-
Click Export | Static Excel on the Reporter Tools ribbon.
-
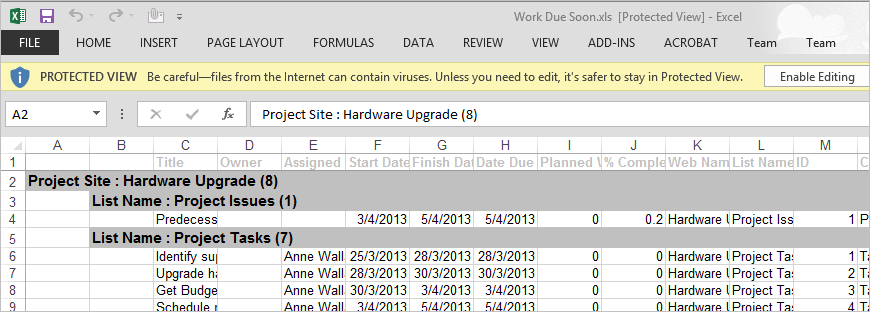
Click Open.

-
Click Yes.

The Excel file will open.
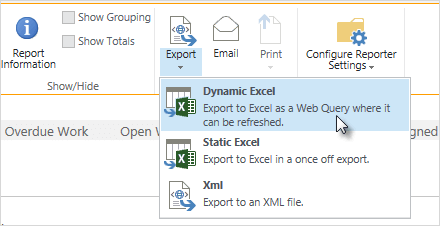
Export a Report to Dynamic Excel
BrightWork also enables you to create a web query that establishes a refreshable data connection with a selected report that will update every time you open the Excel file. This means you can do things like combine live data from BrightWork with data from other sources and use Dynamic Excel to analyze this data.
-
Click in the Work Due Soon report header to activate the Reporter Tools ribbon.
-
Click Export | Dynamic Excel.
-
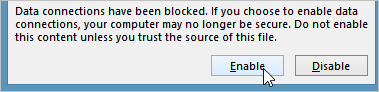
Click Open.

-
Click Enable.
-
Enter your Username and Password and click OK.
-
Click Data | Properties and select Refresh data when opening the file.
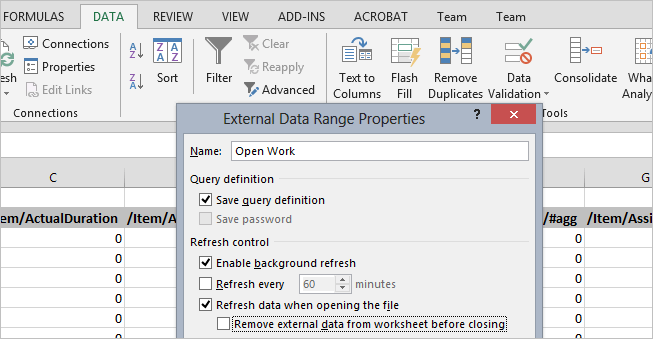
-
Click OK.
-
Save and close the file to a suitable location.Now, whenever you open this file it will automatically update with the latest information from the report.
Note: Reporter Tools filters, like you added previously, are not supported when exporting report data – all the data returned by the non-custom report will be exported.
Reporter Tools Sharing and Configuration Options
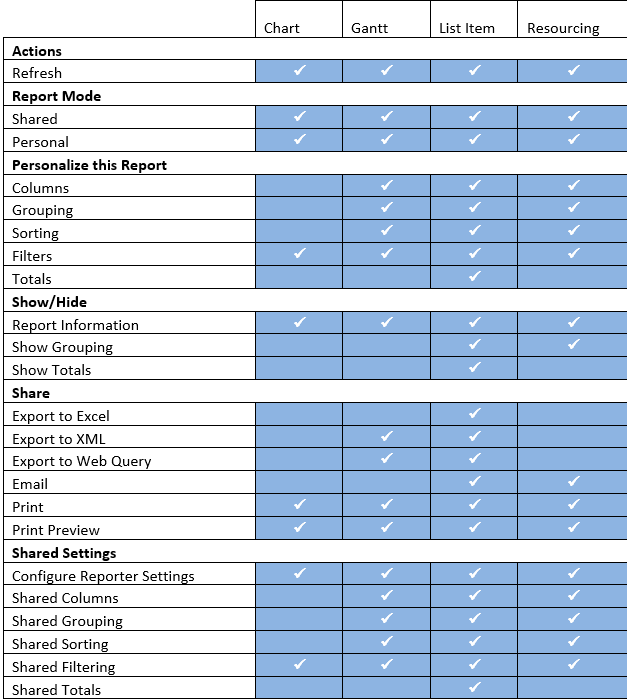
The table below displays the options that are available from the Reporter Tools ribbon for each report type.
Suggested Exercise
Use the reporter toolbar to print a report.
Looking for templates on Microsoft 365?
BrightWork 365 lets you plan, manage, and collaborate in Microsoft 365.