
Key Takeaways
-
Overview of key project documents
-
Benefits of managing documents with SharePoint
-
Using the Document Library in SharePoint Server
-
Using the Document Library in SharePoint Online in Microsoft 365
-
Capabilities that make SharePoint a secure document management system
Having the right project documentation and an easy way to manage these documents is essential to remote project management.
This article explains how to standardize and manage project documents using a project site in SharePoint Server or SharePoint Online with Power Apps. It also outlines steps to create, manage, and track documents in a SharePoint document library.
Managing documents in BrightWork 365
BrightWork 365 uses the right Microsoft 365 app for the right project management process, all wrapped up in project management templates.
It integrates seamlessly with SharePoint Online for efficient project document management. SharePoint serves as the central storage for project files within your Microsoft 365 environment.

What is Project Documentation?
Depending on the nature of your project and local guidance, there are many types of project documentation to consider. Below is a suggested list of essential document types to consider for your project:
1. Business case
This document is part of the initiation phase and is used to secure approval for the project.
2. Project charter
The project charter is the most important document for any project manager. It formalizes project approval and supports your authority as project manager. Simply put, the project cannot exist without it!
3. Project statement
Created during the planning phase, the project statement, or statement of work, explains how your team will deliver the requirements outlined in the project charter.
It clearly defines what is included and excluded in the project, ensuring proper scope management.
4. Project communications plan
The project communication plan explains who needs to receive what information, when, and in what format, for example, a weekly meeting with the project sponsor.
5. Risk register
This document specifies project issues and task owners.
6. Lessons learned
During the project closure, document lessons learned to help improve internal processes and future projects.
How to improve team collaboration using SharePoint project documentation
The project manager is the main communication channel in a project, especially when working remotely. Stakeholders, team members, vendors – everyone wants to talk to you!
Organizing project documents is critical for handling these interactions seamlessly. With document automation, it’s even easier to manage and streamline your team’s workflow.
Benefits of project documentation
Some of the primary benefits of well-managed project documentation include:
A single, accurate record of project work and deliverables.
Centralized access for seamless reporting
Clear descriptions of individual roles and responsibilities to prevent conflict or misunderstandings
Easy retrieval of documents for team collaboration
Better communication with stakeholders.
A unified source of knowledge is essential for remote teams
How can SharePoint manage project documentation for remote teams?
Remote project teams rely heavily on documentation. The outlined list above provides a solid foundation to organize your project. To support collaboration, include additional documents such as:
Meeting minutes
Decisions
Feedback
Processes
Suggestions for improvements, and so on.
Once you have decided on the types of documents you need, you’ll need to find an easy way to store and manage the files.
A SharePoint document library brings all project documents into a single repository, making it easier to find information when needed.
What is a SharePoint Document Library?
SharePoint simplifies collaboration by making it easy to centralize all project documents in one place. Finding relevant information also becomes much faster!
SharePoint Server
A SharePoint project site includes a document library—a specialized list for storing, managing, and retrieving documents.
In SharePoint Server, the default site includes a document library, and additional libraries can be added to your project site as needed.
SharePoint Online
SharePoint team sites in Microsoft 365 act as a central hub for project collaboration, where team members can share deliverables and access project documents.
Benefits of using a SharePoint document library
Using a SharePoint document management system, you can:
Add, edit, delete, and download documents
Co-edit documents in real time
Use version control to restore older versions of a file
Manage access to a library, a folder within a library, or an individual file within a library
Track the activity on a file, including the last modification
Set up alerts to track changes to a document
Create a custom view of a document library
Share files or folders with others using links instead of email attachments
Build different libraries for different content types
How to organize documents in SharePoint
Before adding documents to your SharePoint project site, it’s important to agree on a standardized approach with your team.
1. Agree on a naming convention
Firstly, you should decide on a naming convention. This simplifies file searches and keeps your project organized.
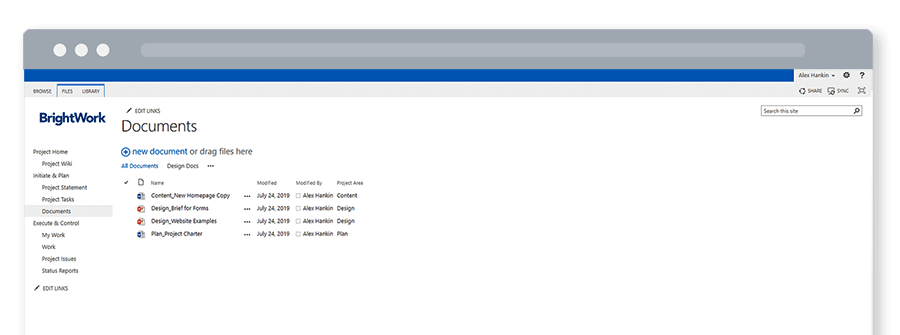
For example, in a website redesign project, file names can reflect the area of work. Planning documents will include ‘plan’ in the title; the same applies to ‘content,’ ‘design,’ and so on.
Plan_Project Charter
Content_New Homepage Copy
Design_Brief for Forms.
If our designer wants to find a document, all they need to do is search ‘design’ in the document library.
2. Maintain a single-file version
Next, to prevent confusion from multiple versions of the same file, maintain a single, updated copy on the project site.
Ask your team to download and work on the relevant file stored on the site instead of creating multiple versions of the same document with different dates or notes added to the title.
Incorrect:
Content_New Homepage Copy_211118
Content_New Homepage Copy_Final
Content_New Homepage Copy_Final Final
Correct:
Content_New Homepage Copy.
When editing documents, use Microsoft Edge to download files and sync changes directly to the library. Avoid downloading files that create ‘read-only’ copies, as these require manual saving and re-uploading to the library.
3. Avoid using folders
Finally, it’s best to avoid adding folders to your document library. Everyone has their own way of managing their files and folders on their local machine. Imagine how confusing your document library would be if the team re-created their own approach on the project site!
The search and metadata capabilities in SharePoint eliminate the need for folders. Once your project documentation is standardized, you can create a well-structured SharePoint document library.
How SharePoint secures project documents
If you are a project manager who wants to use SharePoint to manage documents and project deliverables, you may wonder about its security features.
SharePoint provides a number of features to protect project documents from unauthorized access and ensure they are securely managed.
1. Permissions
SharePoint allows you to set unique permissions for each site, list or library, folder, and document.
This lets you control access to each item in your project for both individuals and groups, simplifying management for larger projects.
2. Encryption
SharePoint allows you to encrypt your project documents to prevent unauthorized users.
3. Access logs
SharePoint also provides auditing and logging features that allow you to track who has accessed your project documents and when.
4. Approval workflows
SharePoint allows you to set up workflows that require approval before documents can be published.
5. Version control
SharePoint’s version control features allow you to track changes to your project documents over time.
Project management on Microsoft 365
Watch a demo of BrightWork 365 project and portfolio management templates for Microsoft 365, Power Platform, and Teams.
How to manage project documentation with BrightWork for SharePoint Server
1. Add Documents to the SharePoint Library
Once you have downloaded and installed the Free Template, launch your project site.
Using the third tile highlighted below, add new documents to the document library.
2. Searching Project Documents
To search for a document, click the search box in the top right-hand corner of your site or document library.
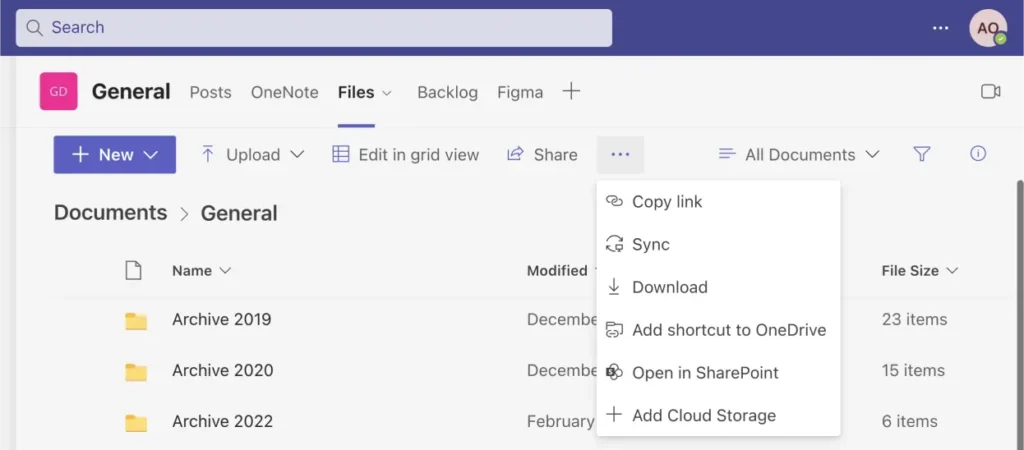
3. Tracking Project Documents in SharePoint
You can add an email alert to any file in your SharePoint document library to track documents. For example, if the homepage content of your new website is finalized and approved, you can ensure no one modifies it. First, select the relevant document and click ‘files’ from the editing menu at the top of the project site.
Next, choose ‘Alert Me’ and click ‘Set Alert on This Document’.
Note: You must be a site collection administrator to implement these steps. The Free Template allows you to create and manage individual project sites, but it doesn’t support cross-project reporting. Learn more about the full BrightWork PPM Solution for SharePoint On-Premises.
Get a Free SharePoint Project Management Template
Download your SharePoint template that is pre-designed to manage a project.