

Key Take Aways
SharePoint workflows are being phased out and replaced by Power Automate. Microsoft has been encouraging users to transition from classic SharePoint workflows to Power Automate for a while now. SharePoint 2010 workflows were deprecated in November 2020, and SharePoint 2013 workflows are expected to follow a similar path.
Power Automate offers enhanced capabilities, including AI-driven automation, better integration options, and improved security and governance. It allows users to create automated workflows between various apps and services, making it a powerful tool for modern business processes and project management.
A workflow is a way of getting tasks done in a logical way. According to Harvard Business Review, more than 90% of employees surveyed said that workflow automation boosted their productivity.
Retirement of SharePoint 2010 and 2013 Workflows
As part of the evolution of Microsoft 365, SharePoint 2010 workflows were retired on August 1, 2020, for new tenants and removed from existing tenants on November 1, 2020.
In addition, SharePoint 2013 workflows were deprecated in April 2023. They were turned off for new tenants on April 2, 2024, and fully removed from existing tenants by April 2, 2026.
Microsoft recommends migrating to Power Automate or another supported solution.
Power Automate is a powerful tool that allows you to automate workflows and processes across various applications and services. In this guide, we’ll explore how to get started with Power Automate, its key features, and how it can enhance your productivity.
What Are Power Automate Workflows?
Power Automate workflows are automated processes that allow you to streamline tasks and operations across various applications and services. These workflows, known as “flows,” can be triggered by specific events, run on a schedule, or be initiated manually. Power Automate helps reduce manual effort, increase efficiency, and ensure consistency in repetitive tasks.
Can You Use Power Automate with SharePoint Server?
Yes, you can use Power Automate with SharePoint Server, you just need to setup an on-premises data gateway to connect your SharePoint environment with Power Automate.
The data gateway allows you to maintain your on-premises SharePoint infrastructure while also allowing it to interact with cloud services such as Power Automate and the rest of the Power Platform.
Types of Power Automate Workflows
Power Automate workflows help project teams to collaborate on documents and manage tasks easily. They can run on SharePoint lists and libraries to allow automation of various processes.
There are five types of Power Automate workflows:
Instant Flows
These flows are initiated by the user, often through a button click in the Power Automate app or a connected application.
Scheduled Flows
These flows run at specified times or intervals, such as daily data uploads to SharePoint or regular backups.
Desktop Flows
These flows automate tasks on the desktop, such as interacting with legacy systems or performing repetitive actions in desktop applications.
Business Process Flows
These flows provide a structured guide for users to follow specific business processes, ensuring that tasks are completed in a consistent manner.
Common Uses of Power Automate in Project Management
Many of the same workflows and processes you could run with SharePoint Workflows can also be run with Power Automate instead.
Here are four common use cases for Power Automate to streamline project management process.
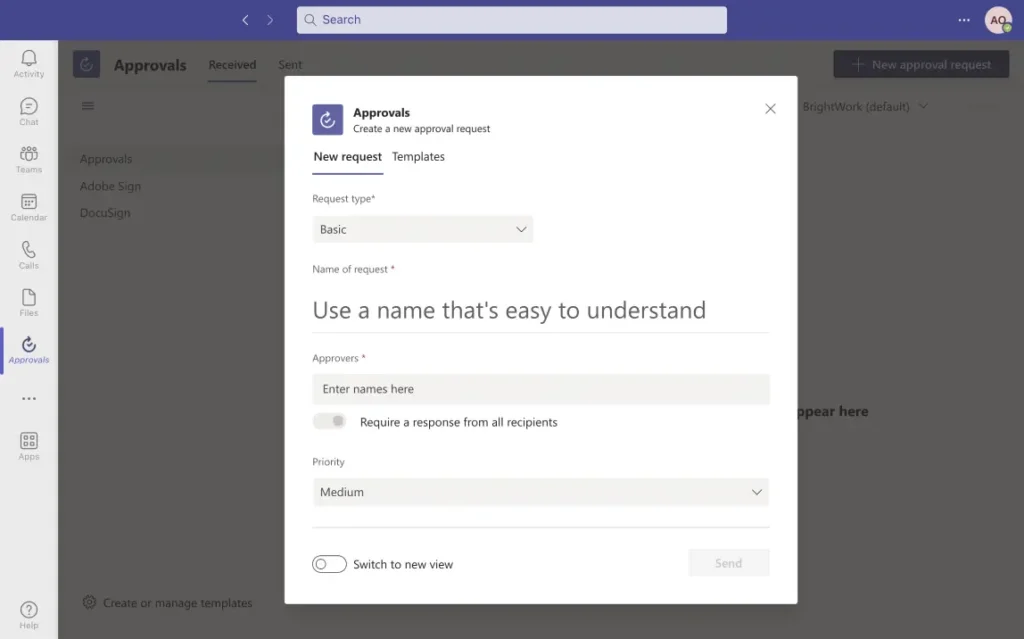
Approval Processes
One of the most common uses for Power Automate (and SharePoint Workflows before that) is approvals for things like documents. It can also be used for any type of approval, such as managing new project request processes.
BrightWork 365 lets you manage the new project intake process within the Power Platform and progress new project requests a number of defined project approval workflows.
Once a project request is logged, the whole process is powered by Power Automate, including approval emails and the creation of new project sites if the project is given the green light.
Task Management
As we mention above, Business Process Flows help to users follow a specific business process.
All BrightWork 365 templates have a Business Process Flow that aligns to the phases of the project plan. You even can require approvals, so that the relevant stakeholders approve the deliverables and sign off on a project moving to the next stage in the project life cycle.
Automated Reporting
One of the most important jobs of a project manager is to keep senior executives, project sponsors, and other stakeholders up to date on project status.
In BrightWork 365, all templates the option for a “Status” tab, where project managers can capture the current state of play. If they want to capture a snapshot of the project status at a given point in time, all they have to do navigate to the “Status Reports” tab, fill in the color commentary, and select the option to create a status report with the given info.
In turn, this will fire a workflow that will generate and (optionally) distribute project status reports automatically, keeping stakeholders informed without manual intervention.
Communication
Microsoft Teams has a native Approvals apps to automate communication and collaboration among project team members.
The Approvals app in Teams makes it easy for users to manage approvals from right with the Microsoft Teams app, including project intake in BrightWork 365.
If you are looking for an easier way to manage Power Automate workflows, BrightWork 365 provides templates to simplify workflow creation and improve project efficiency.