
How to Use Video Meetings in Microsoft Teams
In my previous article on Microsoft Teams for project management, I shared tips to help you get organized and connect with your remote project team.
In this article, we’ll take a closer look at using video meetings in Teams to connect and collaborate on projects.
There are a few ways to use video meetings in Microsoft Teams:
-
Schedule meetings for up to 300 people.
-
View 49 meeting participants in a gallery view, with breakout rooms for smaller groups and discussions.
-
Create a recurring meeting series.
-
Use ‘meet now’ to quickly start a video meeting in Microsoft Teams.
-
Meet one-on-one with individual team members.
-
Host a live event for up to 20,000 people. A ‘view-only’ mode is activated once 1,000 participants join the call.
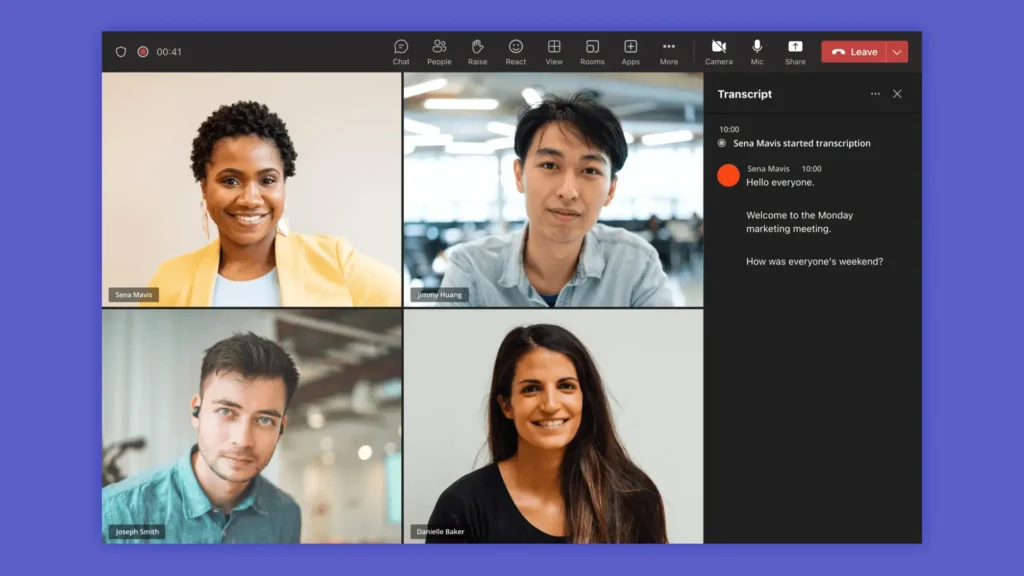
Teams meetings use audio and video with options to switch your camera and microphone off as needed.
Dynamic View, which provides a gallery view of large meetings, also adjusts the size and layout of your meeting for optimal screen use. This is very useful when presenting content to your team.
How to Schedule a Teams Meeting
There are different ways to schedule a Teams meeting:
-
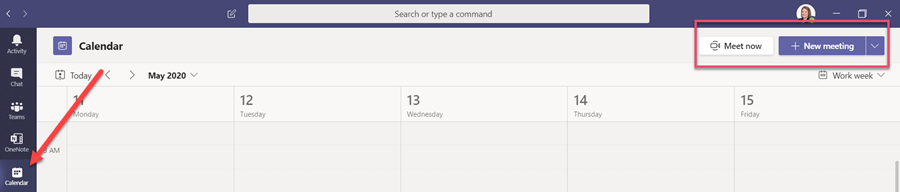
Navigate to ‘Calendar’ in the left-hand menu of the app. There are two meeting options in the right-hand corner: Meet Now and New Meeting.
-
You can also start a call using the video icon in a chat or within the ‘Call’ tab on the left-hand menu, and within Channels.
-
You can also start a call using the video icon in a chat, in a channel, or within the ‘Call’ tab on the left-hand menu.
-
Teams now includes an option to share a link to a meeting without starting the meeting. Simply click ‘Meet Now,’ copy the link, and share via email or chat. In this instance, I’ll select ‘New Meeting’ in my calendar.
Next, complete the meeting invitation, which is similar to Outlook. You can also create a recurring series using the invitation.

Use the Scheduling Assistant to Check Team Availability
To find the best time, use the ‘Scheduling Assistant’ to check the availability of team members before finalizing the meeting. That’s it! Your meeting is scheduled.
Add Context to Your Meeting with an Agenda
To add more context, such as an agenda, click on the session in your Teams calendar. As you can see from the below image, each meeting has options for chat, files, meeting notes, and a whiteboard.
This information is accessible before, during, and after a meeting.

Invite External Guests with a Valid Email Address
Need to invite someone who is outside of your organization? Invite them to the Microsoft teams meeting via email. You can schedule a meeting with anyone who has a valid email address.
The individual will receive a link via email and can attend the meeting using the web app.
For additional functionality, like screen sharing, your guest will need to download and install the desktop client. To maintain privacy, you can decide if external guests need to wait in a virtual lobby before the meeting starts.
Schedule Teams Meeting from Outlook Using Teams Add-On
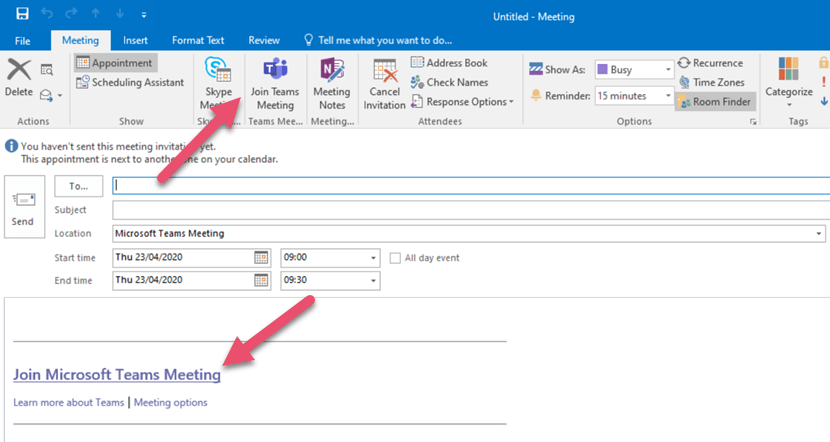
If you have installed the Teams desktop client, you can schedule a Teams meeting in Outlook using the Teams add-on. When scheduling a new meeting, select ‘Join Teams Meeting’ in the ribbon. A link will be inserted into the meeting request.
Wondering how to start a video meeting in Microsoft Teams? There are three ways to start or join a meeting:
-
If using Outlook, click the link in the meeting request.
-
If using Teams, open your calendar and find the relevant meeting. The ‘join’ button will appear on the meeting block about five minutes before the start time.
-
A notification will also flash on your screen when another attendee starts the meeting. Click ‘join’ to attend the meeting.
The Multi-Window Meetings Feature
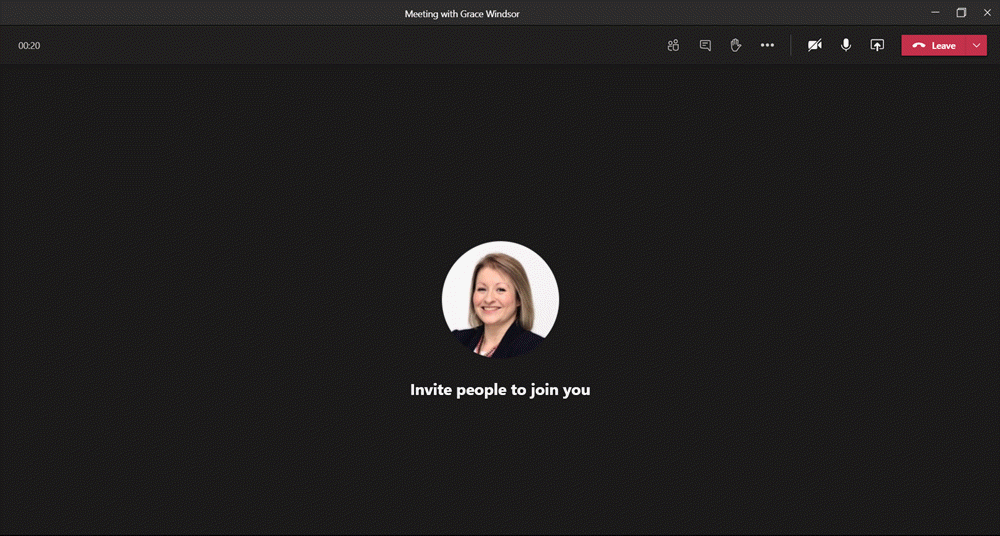
A new feature, ‘Multi-Window Meetings,’ was launched in July 2020. Meetings now launch in a separate window, making it easier to find files or chats in Teams during the call.
When joining a meeting, you can opt to:
-
Switch your camera on or off.
-
Blur your background.
-
Turn your microphone on or off.
Meeting Options
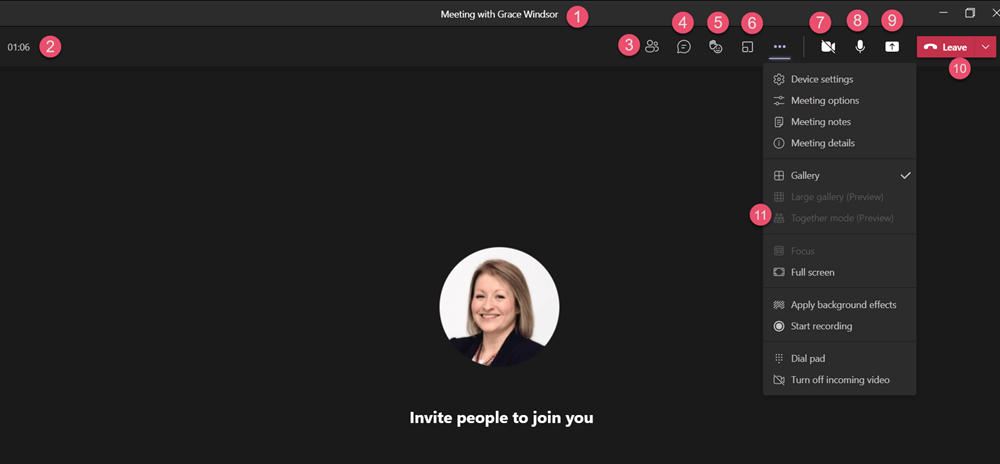
Let’s review the in-meeting menu, accessible at the top of the meeting window.
-
Name of the meeting.
-
Duration of the meeting.
-
Meeting participants.
-
Meeting chat, which opens to the right-hand side.
-
‘Raise your hand’ to ask a question. A yellow box is added around the relevant person’s tile on the call, letting others know they wish to speak.
-
Breakout rooms.
-
Toggle your camera on or off.
-
Turn your microphone on or off.
-
Share your screen. You can share your desktop, the contents of an app, or a document by selecting the relevant screen in the panel below the menu. Users can also request control to share content as needed.
-
Leave the meeting. If you have scheduled the meeting, you can choose to end the meeting for all attendees.
-
Access ‘more actions’ such as recording the meeting, background settings, and ‘Together Mode’.
Try these four features to make your meetings easier to manage!
1. Record and Recap Meetings
Meeting Recordings are stored in OneDrive and SharePoint, and can be shared with your project team meeting after the session to ensure all members (those who were invited to or attended the meeting) are updated.
Anyone can start a recording at any stage during the meeting. Depending on organizational settings, transcriptions may also be available on recordings.
Microsoft recently launched a meeting recap feature, allowing users to access the recording, transcript, chat messages, and notes from either the meeting chat tab or the details tab after each meeting.
This update makes it easier for anyone who missed the meeting to catch up and removes the need to take notes during the meeting!
2. Boost Collaboration with Together Mode
Together Mode in Microsoft team meetings aims to increase collaboration by creating an avatar of each participant and placing these avatars in a shared background, such as an auditorium.
This helps individuals to interact with more social cues and makes it easier to see who is talking in the meeting.
3. Breakout Rooms for Smaller Discussions
Breakout rooms are ideal for brainstorms and collaboration within a larger meeting, for example, a training session with your team.
Meeting hosts can create up to 50 rooms, choosing to automatically or randomly assign participants to each group. Each breakout room has the same functionality as a regular MS meeting.
This capability is available on desktop only; users can join the breakout room from the desktop, web, or mobile app.
It’s also worth noting that only the meeting organizer can start breakout rooms.
4. Presentations Made Easy with PowerPoint Live
PowerPoint Live in Microsoft Teams is a new remote presenting experience. Instead of sharing your screen, you can present your deck from within Teams itself. Select the sharing option and look for PowerPoint Live.
As a presenter, you’ll have access to your notes and chats on a single screen, which also allows you to see your audience. Attendees will only see the active slide and can interact with your content with emoji reactions.
PowerPoint Live will make online presentations a little more fun and engaging!
Privacy and Control for Meeting Hosts
Just like an in-person meeting, meeting hosts need to facilitate virtual meetings to create an enjoyable environment for attendees. Virtual sessions also require additional privacy and control settings.
When using Microsoft Teams video meeting, you can:
-
Mute all attendees.
-
Invite external users and use a virtual waiting lobby to check who wants to join your meeting.
-
Remove participants during a meeting.
-
Designate presenters and attendees to control who can and cannot share content.
Meeting Recordings and Notes for Secure Access
Meeting recordings are available only to those who were invited to or attended the meeting. Likewise, meeting notes are only available to internal users.
Now you know how to schedule and run a meeting in Teams, let’s take a closer look at using video meetings for your projects.
Using Microsoft Teams for Effective Project Meetings
Before you start scheduling video meetings, consider if you need to update your project communication plan.
This is particularly important if your company recently switched to remote working due to the COVID-19 pandemic.
Considerations for Video Meetings in Remote Work
Make sure your team and stakeholders are aware of:
-
The switch to video meetings for face-to-face sessions.
-
Software and hardware requirements, for example, Microsoft Teams and headphones.
-
Where to find training videos and support if needed, including free Microsoft resources.
-
The back-up plan in case of technical difficulties.
Once these details are in place, It’s time to start running virtual meetings for your remote projects.
Preparing for Project Meetings in Microsoft Teams
With a little tweaking, you can replace any face-to-face meeting with a video call in Teams. The key is preparation.
This includes:
-
Creating and sharing an agenda in advance using Meeting Notes as explained above. You can also use a Microsoft team meeting agenda template for this.
-
Assigning times to agenda items – and sticking to those times!
-
Sharing required reading, such as presentations or reports, beforehand.
-
Asking members of your team to prepare contributions or updates.
-
Starting and ending meetings on time.
-
Circulating action items afterward. The BrightWork Marketing Team adds tasks to our project site during meetings, so nothing falls between the cracks.
If you are not sure how to create an agenda, use project meeting templates for team meetings, project sponsor meetings, and brainstorm sessions.
Video Call Etiquette for Effective Project Meetings
Meeting etiquette is also important. Try these ideas for adapting in-person meetings to virtual video calls.
-
If possible, use cameras during the meeting. Just like a face-to-face meeting, the ability to see your team and gauge their reactions is key. With restricted movement in many communities, these interactions are even more important.
-
That said, video requires significant bandwidth and can lead to reduced call quality on occasion. If an individual is unable to use video, request they say their name before speaking so everyone knows who is talking.
-
Some microphones can pick up background noise. Place yourself on mute when you are not talking.
-
Make time for ‘small talk’ at the start of the meeting. Give people a chance to catch-up and share what’s happening.
-
At the start of a meeting, ask if anyone needs to leave early so they can share their updates before leaving.
-
As the meeting host, ask questions during the session to ensure everyone has a chance to speak up and is paying attention!
-
Stay focused on the meeting – that means no emails or browsing online.
-
Turn off other applications and notifications.
-
Try to keep meetings to 30 minutes where possible. Video calls are more draining than in-person meetings as we need to concentrate more fully on non-verbal cues such as facial expressions.
-
Share a summary of actions and follow-ups with owners and due dates after the meeting. Not only will this keep your project on track – it increases accountability within the team.
How to Engage Remote and In-Office Teams in Virtual Meetings
In normal circumstances, your project team may include remote workers and individuals working in an office.
To create an engaging experience for everyone, take a ‘remote-first’ approach to meetings. A simple but effective change is to ask everyone to log into a video call from their desk instead of using a meeting room.
3 Examples of Project Meetings with Microsoft Teams Video
Weekly review meetings, one-to-one sessions, stakeholder meetings, employee onboarding – any face-to-face project meeting can be hosted virtually in Teams.
Below are three examples – gathering requirements, project kickoff, and daily stand-ups – to help you get started with Microsoft video meetings.
1. Gather Project Requirements with Interactive Tools
Project requirements, interviews, brainstorming sessions, and facilitated workshops can be delivered online with small groups of stakeholders.
If working with a larger group of stakeholders, you may need to re-prioritize your list or run multiple sessions to collect feedback.
As mentioned above, preparation is key to successful meetings – even more so for busy stakeholders.
Use Microsoft Teams to Share Meeting Agendas
Circulate an agenda in advance and ensure attendees know what they need to do during the session.
Ask another team member to facilitate the meeting by recording notes and keeping items within the allocated time.
Facilitate Stakeholder Workshops with Whiteboard Tools
Make use of apps such as the whiteboard and Forms to showcase prototypes, develop mindmaps, get user feedback, and so on.
It’s also good practice to record and share the meeting, especially for anyone who could not attend. Recorded meetings are stored securely in Stream.
2. Run a Virtual Kick-Off Meeting with Your Team
A video meeting is a great way to bring your remote team together to discuss the project before starting work.
If the team has never worked together before or is used to working together in an office, set aside some time at the start for introductions and virtual ice-breakers!
Building trust is trickier when working remotely, so start early – even with experienced team members.
Define Project Objectives and Goals
Here are some key project-related areas to cover afterward:
-
The objectives and goals of the project.
-
Roles and responsibilities.
-
Timelines, deliverables, and project milestones.
-
Ways of working, including reporting and collaboration.
-
Risk management.
-
Project management software and tools.
Make sure to keep and share notes after the meeting and update the project site as needed.
3. Daily stand-ups for Quick Progress Updates
A daily stand-up should take around 15 minutes with the team answering three questions:
-
What did I work on yesterday?
-
What am I working on today?
-
What issues are blocking me?
A common problem with running a daily stand-up remotely is location. Picking a time that works for everyone may not be possible.
Instead, create a channel for posting daily updates and schedule weekly team video calls to catch up.
Tips for Setting Up Video Meetings
To conclude this article, I’ll share practical tips for setting up your home office or workspace to optimize video meetings.
Optimize Lighting and Position Your Camera
Think about the lighting. Try to place lighting – whether natural or artificial – in front of you so your face is easier to see.
Ideally, you should be at eye level with other people on the call. Try raising your laptop slightly or placing a separate camera at eye level.
Maintain Proper Distance and Camera Framing
In terms of position, don’t sit too close or too far away from the camera. Best practice suggests you should be seen from shoulders to head, or from the waist to the head. It’s also a good idea to invest in a comfortable chair – too much movement is distracting.
Use Background Features and Prepare Your Screen for Sharing Content
As mentioned above, it’s easy to blur or change your background in a Teams video meeting – a handy feature if your office is untidy!
If you know you need to share your screen, turn off applications and close tabs beforehand.
Finally, test your audio equipment and software regularly, especially before important meetings. Log in a few minutes early to make sure everything is working.