How to Use SharePoint Workflows for Project Management
In this practical guide, we’ll cover the basics of workflows to automate project proceesses and how to use SharePoint workflows and Power Automate to streamline project management.
By Shubhangi Pandey | 20 Min Read | Updated September 27, 2024
What is a Workflow?
All projects rely on tasks to deliver as expected. Tasks are the essence of project management. Improve task management and you can save time, avoid rework, and deliver better results. Implementing workflows to automate tasks is a significant step towards controlling and improving project outcomes.
In this practical guide, we’ll cover the basics of workflows and how to use SharePoint workflows and Power Automate to streamline project management.
A workflow is an optimal way of getting work done in a logical sequence. Often represented as a diagram, a workflow links together small tasks to achieve a larger end goal.
You are likely using workflows on a daily basis without realizing it!
Examples of workflows include:
- Submitting a vacation request.
- Sending a purchase order to accounts for approval.
- Collecting feedback on a document.
- Moving documents uploaded to the wrong library in SharePoint to the correct library.
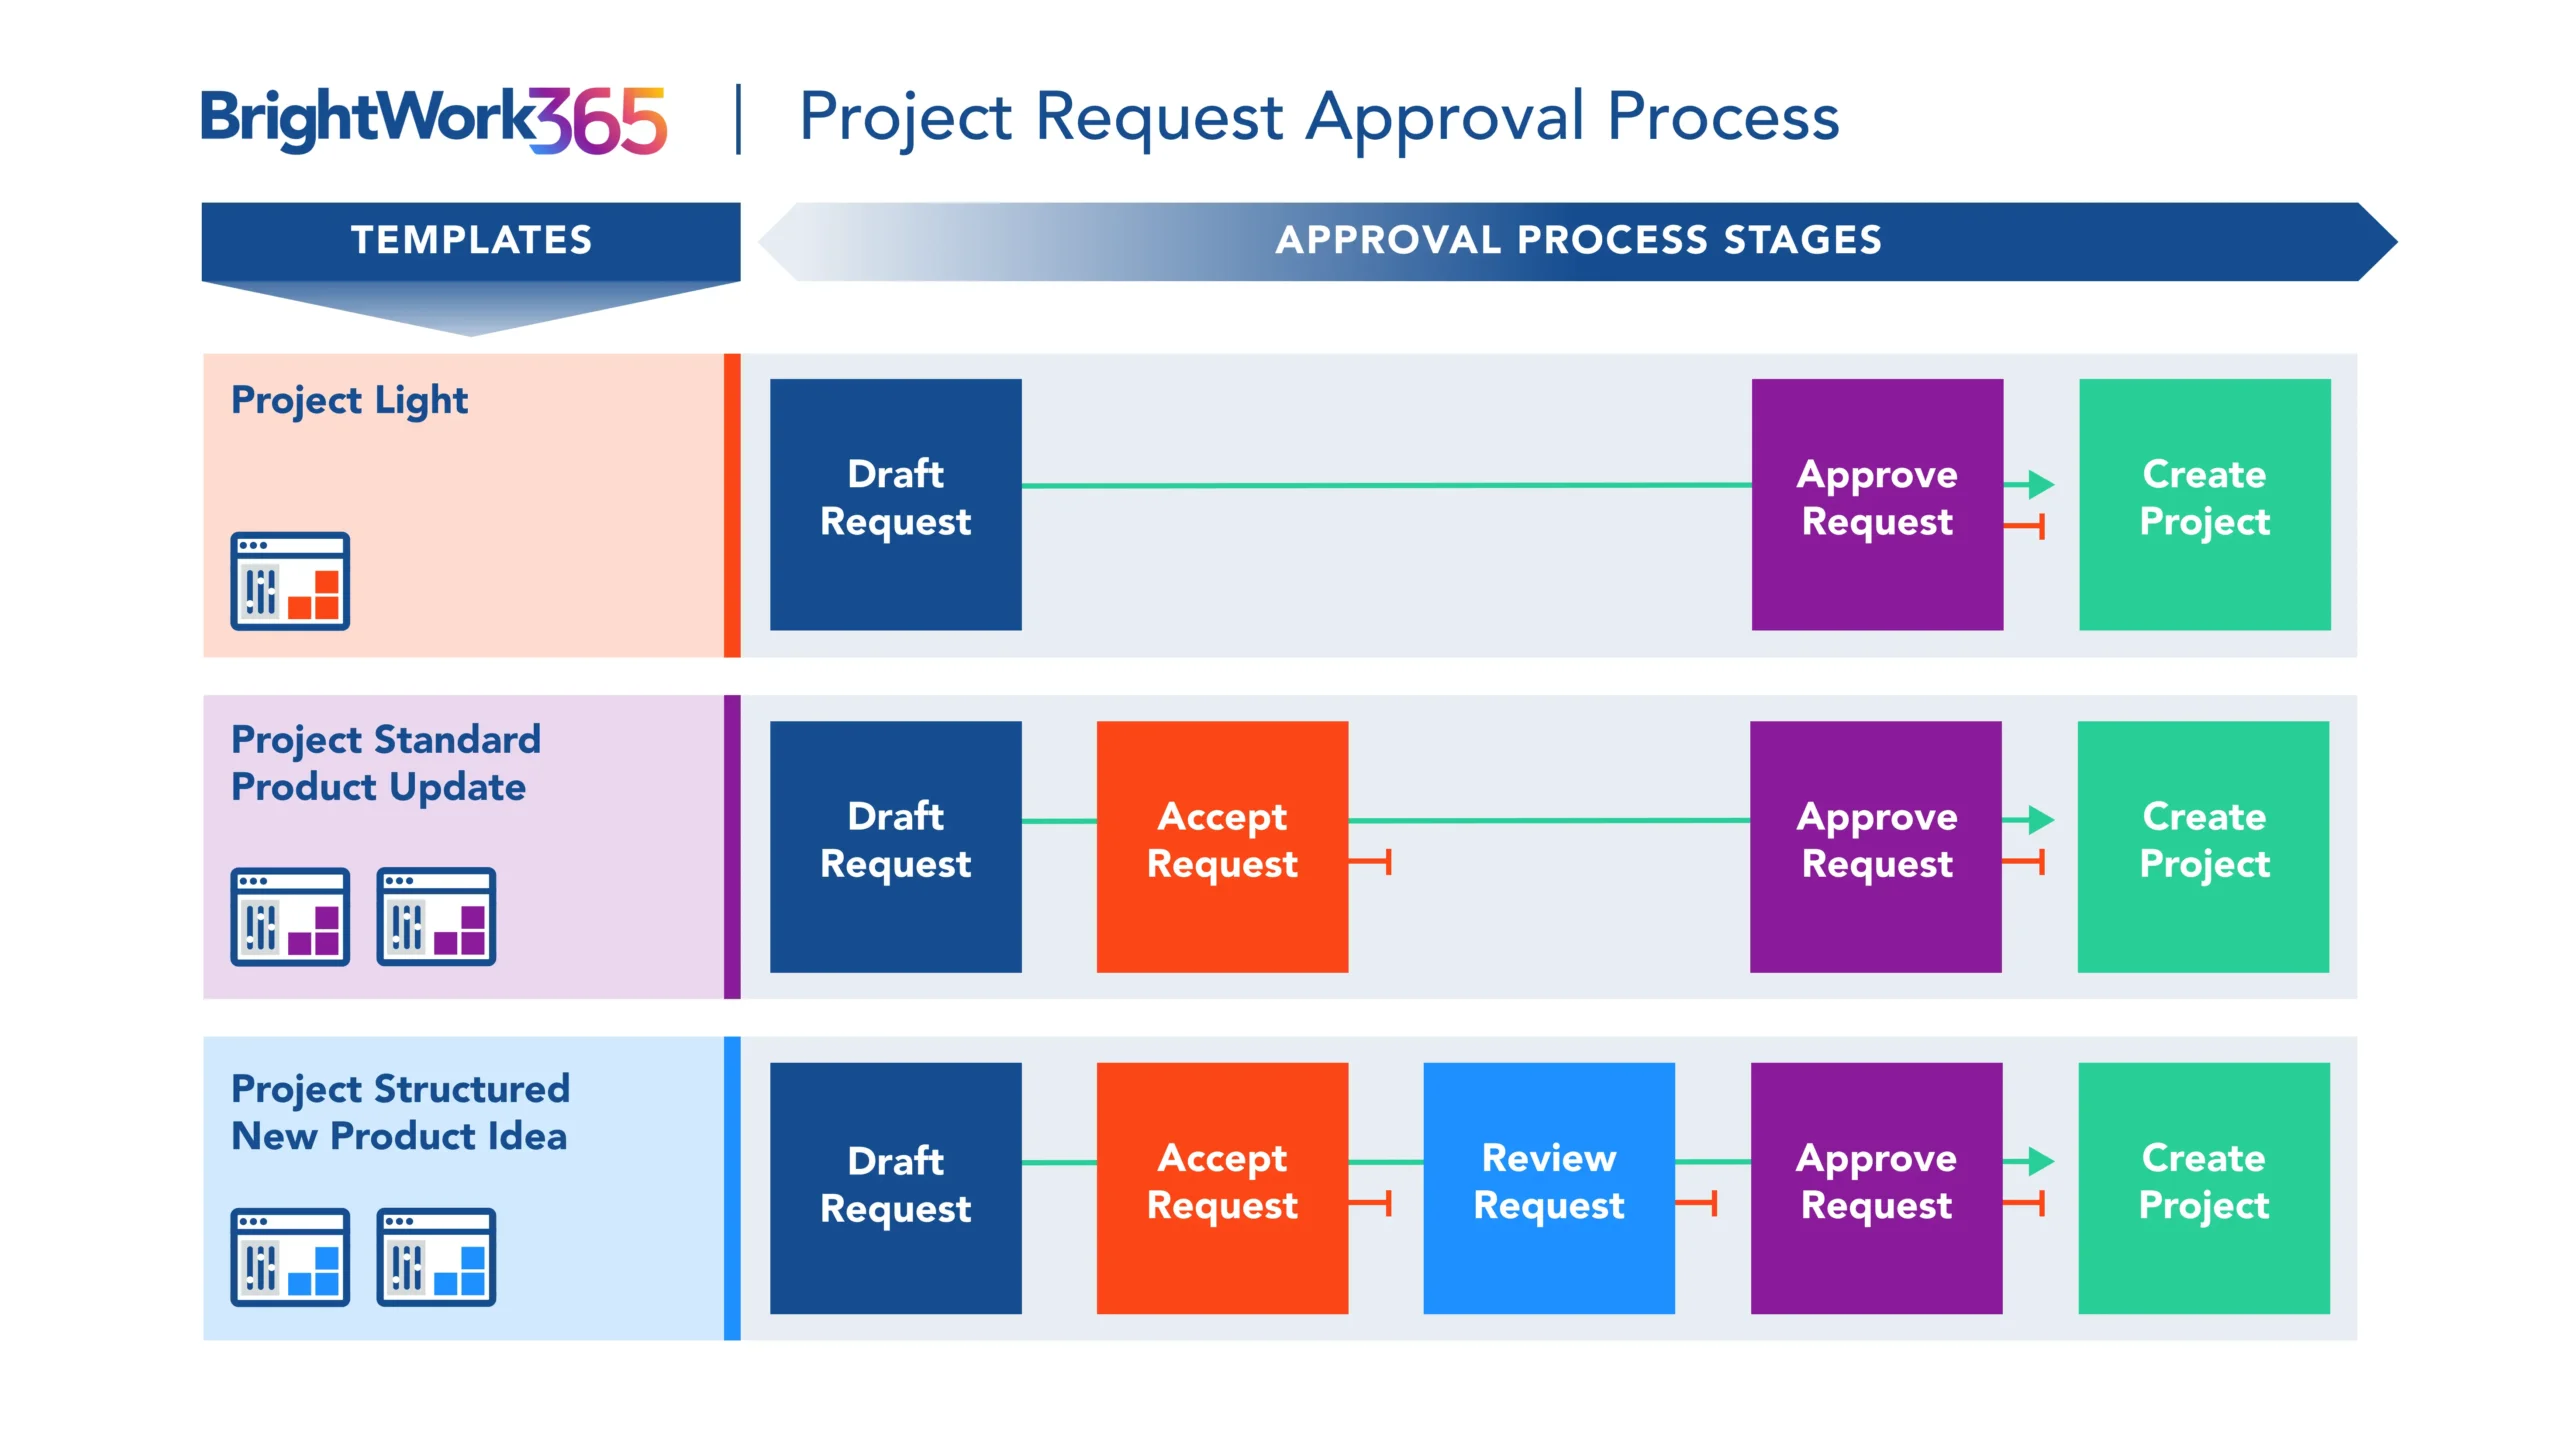
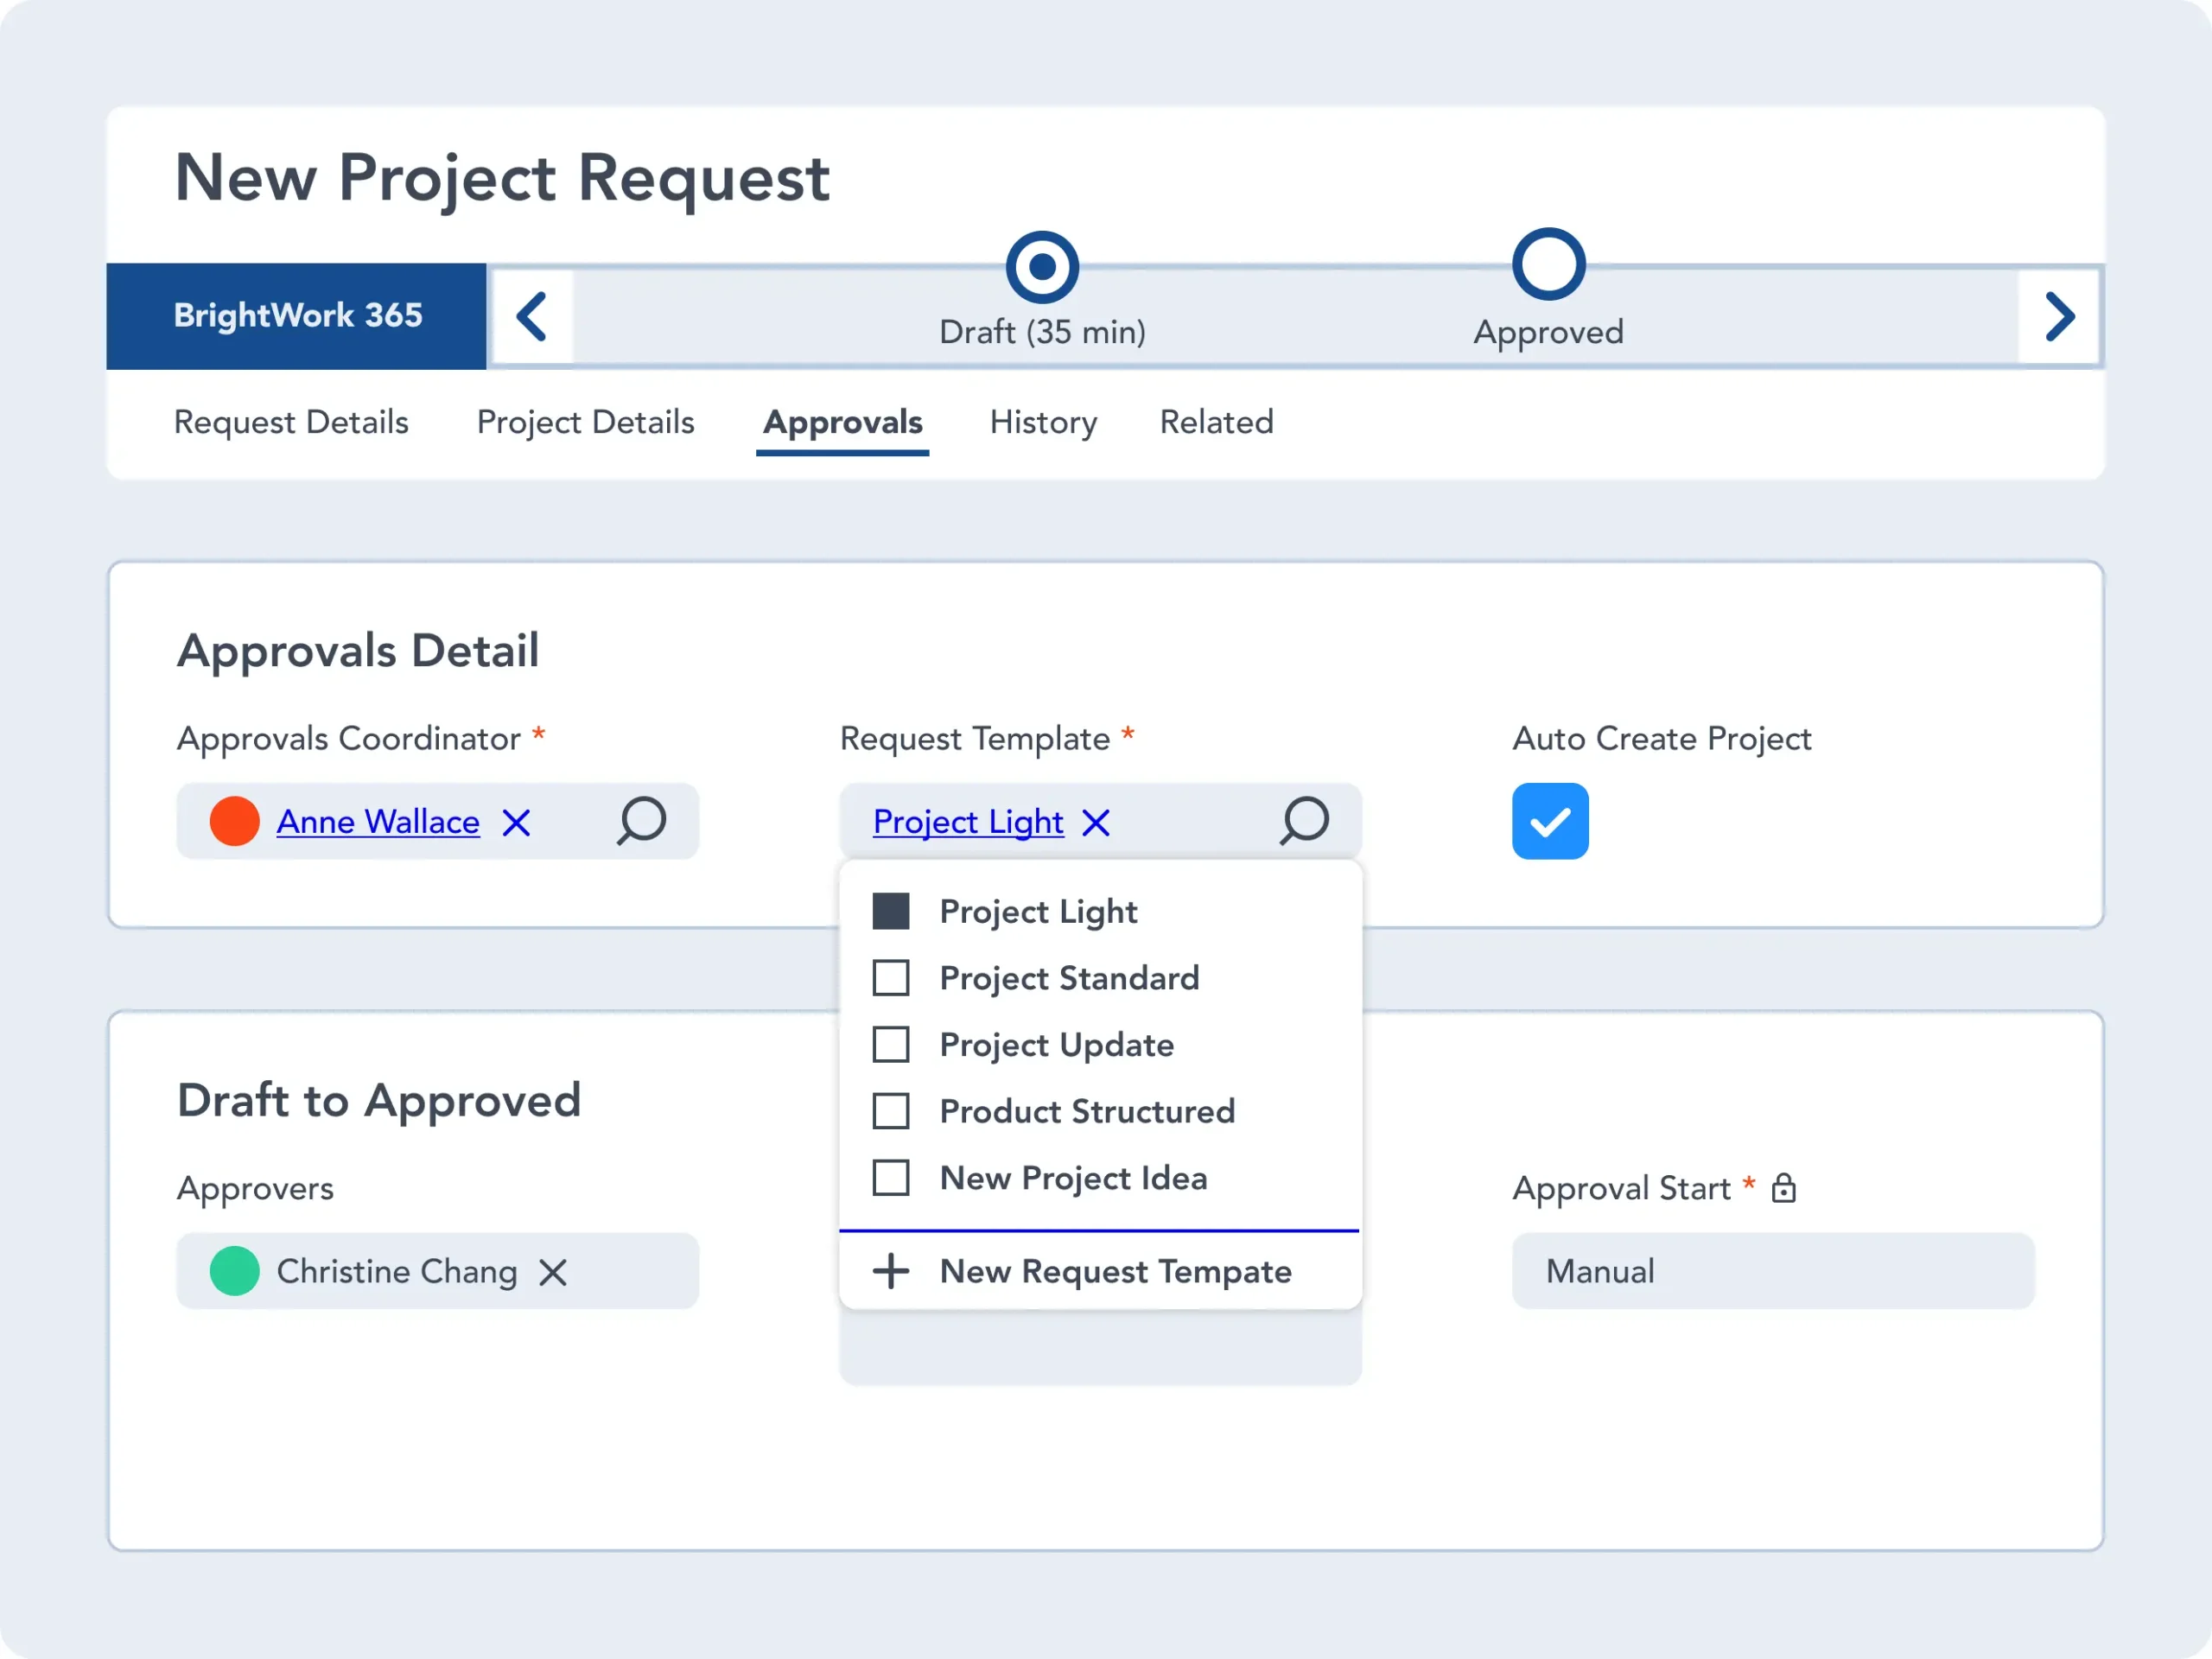
Above is an example of a workflow for managing new project requests. The process starts with a draft and moves through each stage using automated emails. Once reviewed, the request can be sent back to a previous stage for more details. The workflow ends when the request is rejected or approved.
Workflows can take any length of time and can be delivered by one person or an entire team. It really depends on the goal at-hand.
However, the aim is always to move between steps efficiently, freeing up time and energy for important tasks.
Workflows frequently combine human and automated actions.
- The task of creating a new project presentation may be assigned to a member of your team (a human, manual input).
- Once the document is uploaded to the system, an approval workflow could be triggered, which sends an automated email to the relevant person (an automatic action).
Each part of a workflow must have a relationship with a previous step.
Using the example of a vacation request, imagine you receive an automated email to review a new request from a team member.
This email is triggered when the request is added to an online system and requires a response from the approver (you). You can choose to approve or deny the request, which will trigger another automated email to the original requester. Each piece of the workflow depends on a prior action until the workflow is complete.
Workflows allow users to return to a previous step in the process as needed. Let’s say you reject the new vacation request as it clashes with a key project milestone.
You simply mark the request as ‘rejected’ to send an automated email to the original requester. The individual can amend the dates and resubmit the request, thus re-starting the process.
Workflows were invented by in the 1920s as a way of optimizing work. Gantt documented processes by asking three key questions:
- What tasks were being done?
- Who was responsible for each task?
- How long did each task take?
The same principles still underpin workflows today.
Workflows represent business processes, ways of completing work in your organization. They provide a framework for completing a task the same way every time by any individual. Once the process is mapped as a workflow, issues are more easily identified and addressed.
However, a workflow and a process are not the same:
- A process refers to the data, reports, forms, decisions, and so on needed to complete the task.
- A workflow is a sequential ordering of the tasks and is part of processes.
Imagine you need to create a detailed project plan for review by senior management. You can easily build an approval workflow to share the document when it is uploaded to a document library. In addition to sending an initial email, you can also automatically send reminders if the document is not reviewed by a certain date.
However, you will use a larger process for creating the project plan such as gathering data for a business case and creating a draft schedule. Going even further back, you may need to ask an internal subject matter expert for their input and speak to senior managements to gain support for the project.
A process defines all of the deliverables for a task. A workflow helps to deliver that task in an optimized way.
Business processes and workflows can improve project outcomes with easier access to information and approvals. Of course, processes and workflows are not only limited to projects!
Elements of a Project Management Workflow Process
Workflows are made up of four components. Let’s take a closer look at each component using the above example of a vacation request.
- Actors, people or software responsible for the task. In this case, team members log a new request to a HR portal. This triggers an automated email to managers for review.
- Activities, the task that is performed, often represented as a step. Here, this includes logging and reviewing the request.
- Results, the desired outcome of each step – ideally, approval for a vacation!
- State, the movement between step. In this case, the request moves from ‘draft’ to ‘review’ to ‘approved or rejected’ with minimum effort.
Each step of a workflow has three parameters as follows:
- Input, the resources needed for a step.
- Transformation, what actually happens to the input, for example, making a decision about the vacation request.
- Output, the outcome of the step, which often act as input to the next step.
Finally, there are different types of workflows.
- Process: A process workflow refers to predictable and repetitive tasks. The workflow has a clear path with few variations, for example, a project plan is either approved or rejected.
- Case: A case workflow has an unclear path to conclusion, for example, a support ticket.
- Project: Project workflows are similar to process workflows with a little more flexibility to meet the needs of individual projects. These workflows help to drive the project forward.
Now that you know more about workflows, it’s time to review the benefits of workflows and their application to projects. As you’ll see, workflows are a powerful way to boost productivity and help your project team to work effectively.
Benefits of Workflows for Project Management
As mentioned above, workflows create a framework for completing work in an agreed, repeatable way.
Workflows offer numerous advantages to organizations including:
- Less time and effort on administration work.
- Standardized processes across all teams.
- Easier compliance with regulatory requirements.
- Reduction in errors, rework, and risk.
- Improved communication.
- Opportunities for continuous improvement.
- Increased transparency with clearly defined responsibilities.
Project teams can leverage workflows even further. When applied to projects, workflows help to:
- Make deadlines easier to predict with clearer insight into the duration of tasks.
- Improve resource management and allocation.
- Increase visibility for stakeholders with approval workflows and notifications.
- Provide easy-to-follow instructions for tasks.
- Improve collaboration with more insight into individual responsibilities and progress.
- Eliminate redundant or duplicated effort.
- Create an audit trail for key decisions.
- Quickly introduce new team members to the project.
Project managers can also use workflows to monitor the status of tasks using automated emails and track new issues, reducing the need to constantly ‘check in’ with the team.
Workflows help to streamline non-project work, such as blocking out time on a calendar, creating tasks from important emails, and tracking expenses in Excel.
With workflows running in the background for various tasks, you can focus on the project itself and deliver the expected results more smoothly.
4 Project Workflow Examples by Industry

In addition to the benefits of adding workflows to your projects, particular industries can use workflows to maintain strict governance and deliver better outcomes for customers.
Let’s take a closer look at workflows for government, healthcare, financial services, and manufacturing organizations.
1. Government
Traditionally, many public services are delivered in-person, within certain working hours, and with a heavy reliance on paper forms.
As a result, government workers are often buried under mountains of paperwork with little time for deep-focus, valuable work.
A move towards digital government – using technology to provide services – is putting pressure on agencies to modernize their ways of working.
Using workflows to automate repetitive tasks and document management is a simple yet effective starting point – especially for organizations using SharePoint.
Automation paves the way towards digital government, creating time for citizen-centric and mission-critical services.
Using workflows, government employees can:
- Digitize paper-based information at the source.
- Accept and use information in any format, for example, photos and speech-to-text files.
- Route the file(s) to the relevant person.
- Prompt the recipient to take action with reminders.
- Build compliance into each step of the process for increased accountability.
- Standardize files across teams and departments.
- Quickly collect feedback and electronic signatures on key documents.
- Accelerate Freedom of Information.
2. Healthcare
Healthcare projects are increasingly focused on leveraging new technology to improve patient care in a cost-effective way.
Projects including going paperless with electronic healthcare records, cloud computing, AI, and big data.
Healthcare project teams also operate within strict data and security protocols, requiring a proactive approach to risk management.
Standardizing project management processes with templates and workflows is an essential step towards staying ahead of risks and litigation.
Digitizing paper-based processes, combined with automation, helps project teams to easily collaborate and deliver better results for patients.
Workflows applications include collecting signatures or feedback on documents, and sharing documents for approval.
3. Financial Services
Operating in increasingly complex environments,
Automation helps financial institutions to do the right thing the right way, with governance built into every step of the process.
Automated workflows can be applied to numerous processes such as:
- Customer onboarding
- ‘Know Your Customer’ data collection and checks
- Credit card operations
- Updating customer information
- Claims Processing
- Invoice management
- Anti-laundering efforts.
- Back-office processes such as payroll and invoice management.
Organizations already using SharePoint can start implementing workflows with fewer IT resources or additional spend on a new tool.
4. Manufacturing
Manufacturing organizations can use automation to streamline operations, strengthen their core capabilities, and stay competitive.
Manufacturing organizations are increasingly turning to Lean principles to remove waste, reduce costs, and meet customer demands.
However, outdated IT systems, using spreadsheets to manage projects, and poor visibility hamper efforts to implement lean.
Automated workflows are a quick way to save time, reduce errors, and ensure consistency in every process.
Common examples of manufacturing workflows include:
- Gathering approvals for a new product.
- Inventory management.
- Project task management.
- Standardizing product quality control and governance.
- New vendor selection.
- Improving safety reporting.
Hopefully, you are ready to start using workflows on your project. There are two points to consider before jumping in – what processes do you want to automate with workflows and how will you manage these workflows?
We’ll take a look at best-practices for creating workflows in Chapter 2 and how to use SharePoint workflows in Chapter 3. SharePoint offers out-of-box workflows for a fast start, with the ability to build custom workflows as needed.
Consider updating this outdated source.
Consider removing this external link. The internal link on the paragraph above already covers the semantics of this section quite well.
SharePoint Project Management Workflows
SharePoint workflows are “pre-programmed mini-applications that streamline and automate a wide variety of business processes.”
The purpose of SharePoint workflows is to help people collaborate on documents and manage tasks easily in a SharePoint site. Uses of SharePoint workflows include:
- Document approval
- Collecting signatures or feedback
- Managing new project requests.
SharePoint workflows run on lists and libraries. There are three types of SharePoint workflows :
- A list workflow is used on a list or library. This type of workflow cannot be copied to another list. These workflows are often triggered by an event, for example, the creation of a new list item.
- A reusable workflow is created at site level and is available in other sites.
- A site workflow is not connected to a list or content type, and can be used anywhere in a site. Examples include archiving completed tasks in a project site at the end of each day. This workflow must be triggered manually.
Using SharePoint workflows depends on permissions:
- To add a workflow, you will need the Manage Lists permission. This is added by default to the Owners group (full site control).
- To start a workflow, you will need the Edit Lists permission, available to the Members and Owners group.
As explained below, a site administrator must add certain workflows to a site collection.
SharePoint ships with five types of workflows. These workflows are available with every version of SharePoint.
Note – if you are using SharePoint 2010, you will build workflows on the SharePoint 2010 workflow engine only. SharePoint 2019/2016/2013/Online can use the SharePoint 2010 or 2013 workflow engine.
Let’s take a look at each workflow in more detail.
5 SharePoint Workflow Examples
1. Approval Workflow
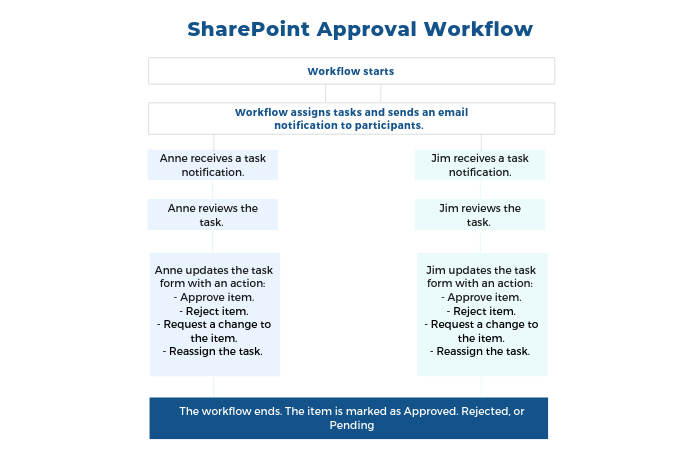
The Approval Workflow is used to share a document or an item in a SharePoint list or library with one or more individuals for approval. When adding the workflow to your site, you can:
- Specify how many people to include.
- Decide if the tasks will run one after another (serial) or all at once (parallel).
The workflow can be triggered manually or automatically, for example, each time a document is added to the project library.
Once triggered, the approval workflow assigns a task to each specified individual. They can approve or reject the item, request a change, or cancel the task.
Individuals involved in the workflow cannot change the item being review; instead, they can send the document back for updates. If you need to gather feedback, use the ‘Collect Feedback’ workflow as described below.
You can add multiple instances of the approval workflow to a site.
By default, this workflow must be activated by the site administrator at the site collection level.
2. Collect Feedback Workflow
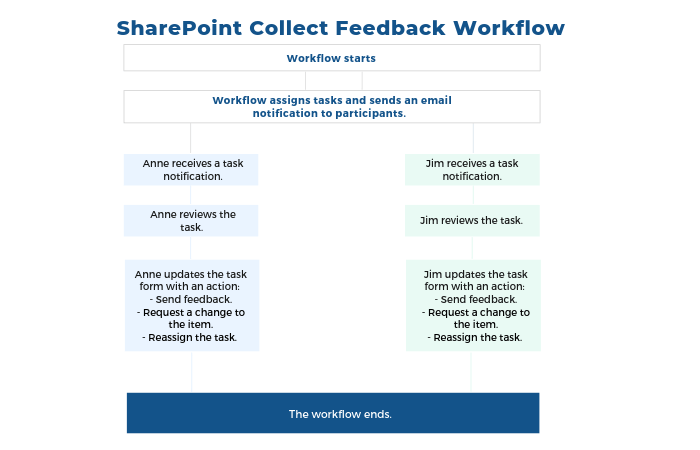
The Collect Feedback Workflow is used to gather feedback on a document. The workflow set-up is similar to the approval workflow and you can add multiple instances of the collect feedback workflow to a site.
This external link is already featured above, consider removing it.
When adding this workflow, you need to consider how the feedback will be collected:
- Leave comments on the task form only.
- Insert track changes and add comments to the item itself.
If individuals can edit the document directly, you will need to decide how this process will work. There are two options:
- Collaborative environment, allowing multiple individuals to work on the document at the same time.
- Sole-access environment, requiring each individual to check out the document for review.
This workflow must be activated by the site administrator at the site collection level.
3. Collect Signatures Workflow
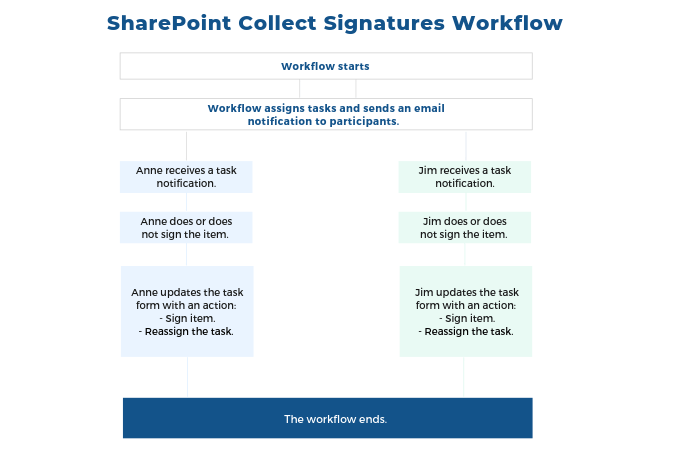
The Collect Signatures Workflow is used with Word documents, Excel workbooks, and InfoPath forms.
Again, this workflow runs in a similar way to the above workflows and must be added to the site by the site administrator.
Before starting the workflow, you must add signature lines for each required individual.
Once a signature is added to the signature line, the document is locked from all changes aside from adding more signatures.
Inserting or deleting a signature line after the first signature is added counts as a change. If a line is inserted or removed, previously added signatures are removed from the document.
To add your digital signature to a document, you must have a digital certificate to prove your identity to relying parties. This can be obtained from a reputable certificate authority (CA).
4. Three-State Workflow
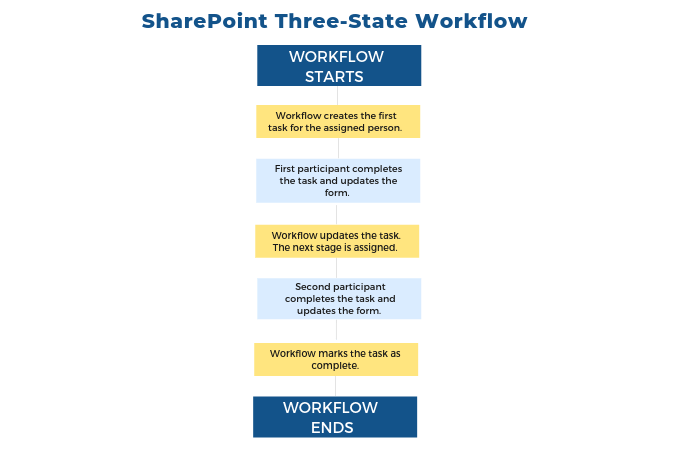
The Three-state Workflow tracks the status of a list item, like a task, through three states or phases.
The workflow can be used with any list that has a choice column with three or more values, for example, not started, in progress, and done.
The workflow will only work with one choice column and three choices. You will need to specify the column and choices when adding the workflow to a list.
When the workflow is started, the relevant individual is assigned a task, for example, write new copy for a website. Once the task is marked as complete, the workflow updates the status, and moves the task into the next step, such as review.
To help relevant individuals work on their tasks, you can add extra information to each step of the workflow. This can include:
- Task title
- Description
- Due date
- Assigned to.
5. Publishing Approval Workflow
The Publishing Approval Workflow is used for publishing new sites. It is not used for publishing site collections.
SharePoint 2013 Workflow Retirement and What to Do Next
Microsoft has announced the retirement of SharePoint 2013 workflows and SharePoint Designer 2013 will be removed from existing tenants and fully retired by April 2, 2026.
It is recommended that users migrate to using Microsoft Power Automate for workflow management going forward.
What is Microsoft Power Automate
Microsoft Power Automate is a no-code/low-code drag-and-drop solution that allows users to create workflows to automate repetitive tasks and business processes. BrightWork 365, a PPM solution for Microsoft 365, uses Microsoft Power Automate flows for essential project tasks and business processes.
Power Automate is part of the Microsoft Power Platform, which includes Power BI and PowerApps. Together, these solutions allow users to leverage data to ‘analyze, act, and automate’ business processes.
Microsoft Power Automate is available on desktop, mobile, and Microsoft Teams, and as a browser app. Pricing starts at $15 per user per month.
Users can start quickly with out-of-the-box templates and connectors, which work across Microsoft 365 apps and third-party services.
Getting Started with Microsoft Power Automate Flows
What is a Power Automate Flow
Power Automate workflow, or flows, are based on triggers and actions.
- A trigger starts the flow, for example, receiving an email from a key project stakeholder.
- An action is what happens once the flow is triggered. This can include creating a task when an email marked as high-importance is received. A flow can have one or more actions.
There are five main types of Power Automate flows, categorized as cloud, desktop, or business process flows.
Cloud flows include:
- Automated, a flow triggered by an event, for example, send an email if an item in a SharePoint list is changed.
- Instant flows allow users to manually trigger a flow from the mobile or desktop app with the click of a button. As an example, easily send a reminder email to your team before a meeting.
- Scheduled, which runs at certain times.
Desktop flows are used to automate tasks on the web or your desktop with Power Automate Desktop.
Business Process flows are based on a defined set of actions to help people complete tasks faster and with fewer errors.
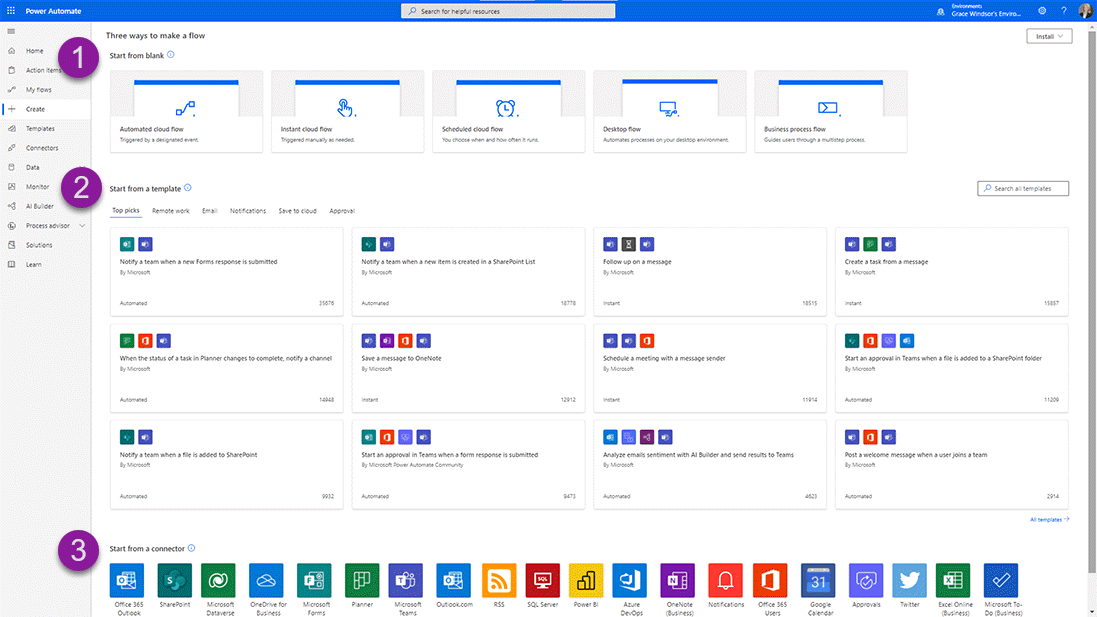
There are three ways to launch a flow:
- Start from scratch with one of the workflows listed above.
- Use an existing template
- Select a connector.
How to Create a Power Automate Flow
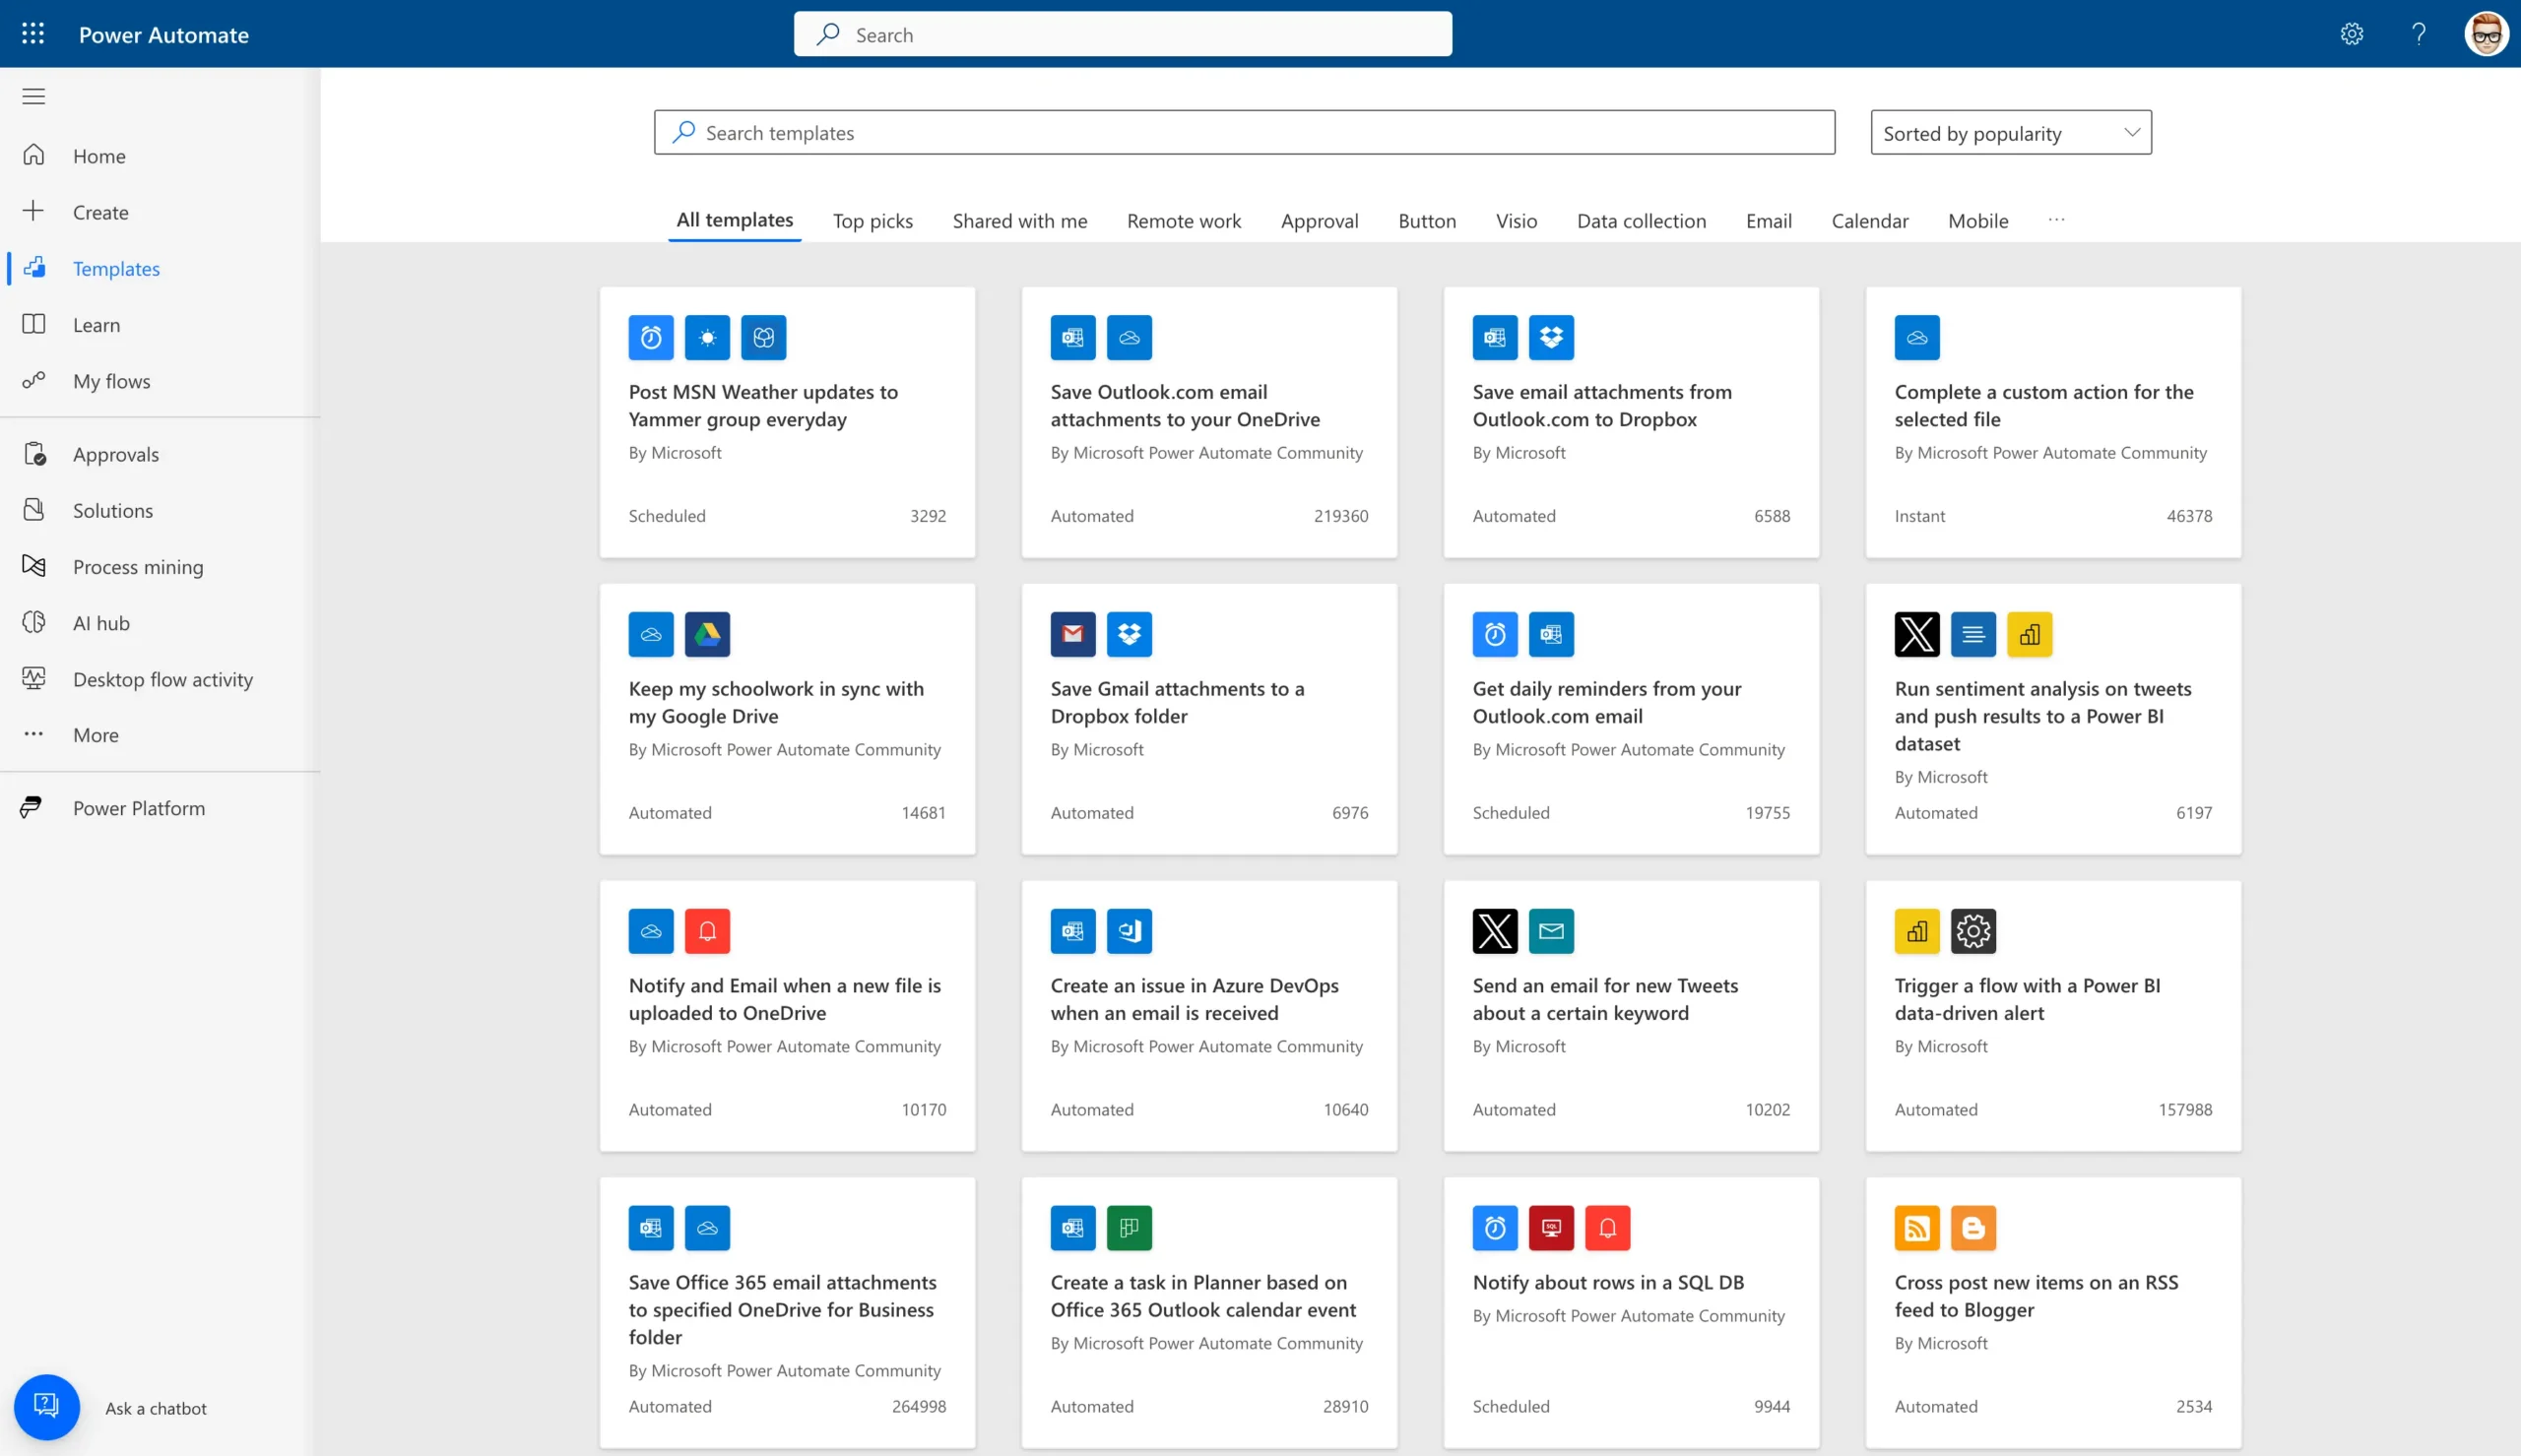
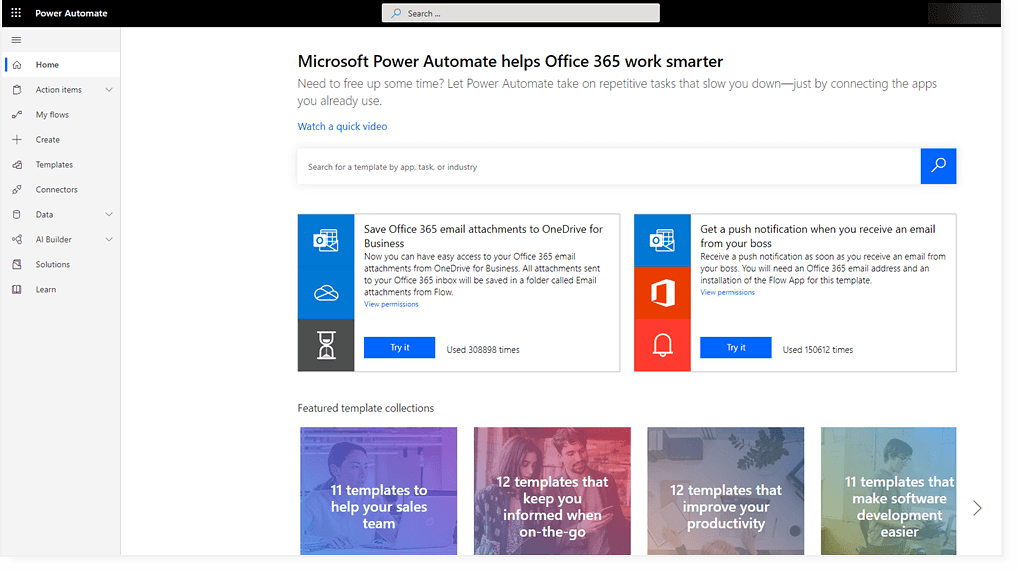
To start using Power Automate, log in to Office 365 and use the app launcher to open the program. From the Microsoft Power Automate homepage, you can:
- Get started quickly with templates.
- Check available connectors.
- Manage your flows.
- Create a new flow.
Let’s create a flow using an existing template. In this example, we’re going to create a task for high-priority emails. This could be useful for staying on top of urgent requests from project stakeholders!
Start by accessing Power Automate in the Office 365 app launcher.
You can use the search bar to find a template or click the Outlook.com icon on the homepage to view existing flows.
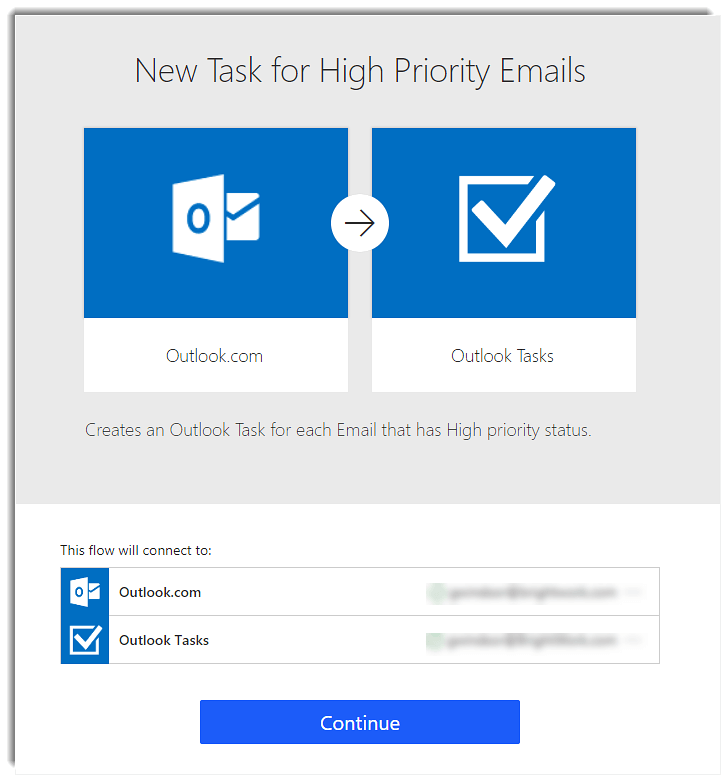
Next, select the template called ‘New Task for High Priority Emails’.
Sign in to Outlook.com and Outlook tasks with your Microsoft account and press continue.
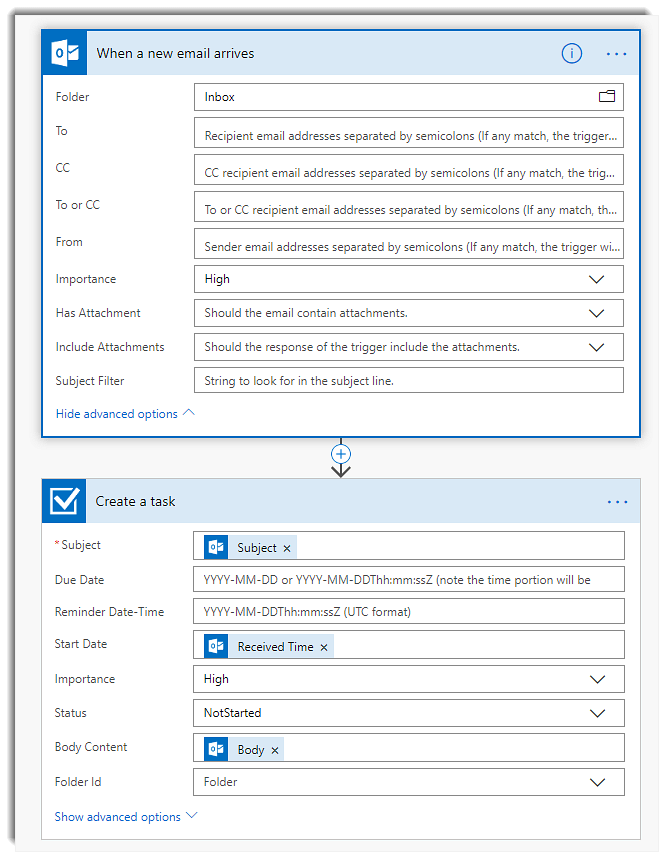
On the next screen, you’ll see how the workflow is constructed. Power Automate is a highly visual tool, simplifying the management of workflows.
Here, you can add extra information such as email sender, subject filter, and a date for the task reminder.
Save the flow. The next time you receive an email marked as high-importance, a task will be automatically added to your calendar.
In the image below, a task, ‘Power Automate article’, was added to my task list from a high-importance email.
You can also customize the flow by adding new steps with actions and triggers.
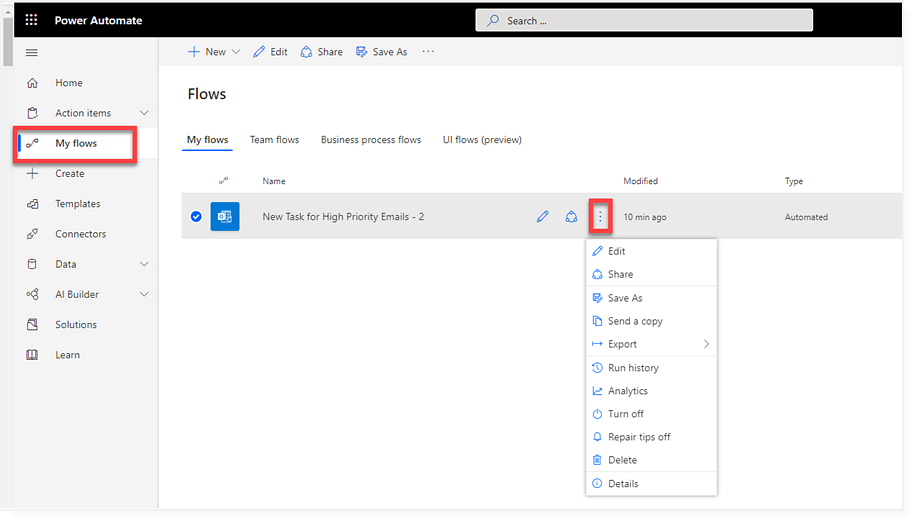
At any time, you can check the status of a flow under ‘My Flows’.
In this area, it’s easy to:
- Edit individual flows
- Share flows with a team member
- Check the history of a flow.
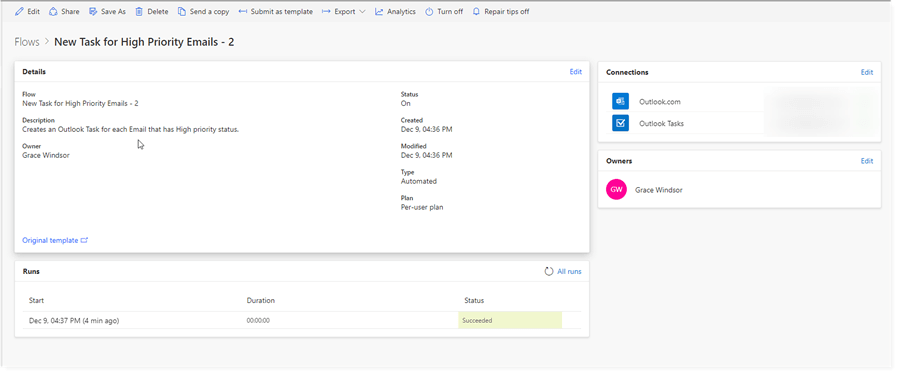
To see more details on a flow, simply click the name of the flow.
How can you use Power Automate to easily create workflows for your project? Here are some templates to consider using. Remember, you can customize an existing template or build a flow as needed.
Project Collaboration in Your Microsoft 365 Cloud
BrightWork 365 centralizes project collaboration with Microsoft 365, Power Platform, Teams, and SharePoint Online.
