

Key Takeaways
-
Workflows Streamline Project Execution
A workflow is a structured sequence of tasks that guides a project from initiation to completion. It helps reduce distractions, automate repetitive tasks, and improve focus and productivity. -
Core Components and Types of Workflows
Workflows consist of actors, activities, results, and states, with each step defined by input, transformation, and output. Common types include process workflows (predictable), case workflows (variable), and project workflows (flexible). -
Benefits for Teams and Collaboration
Workflows improve scheduling, stakeholder engagement, onboarding, and communication. They reduce errors, clarify responsibilities, and create audit trails, making teamwork more efficient and transparent. -
Steps to Build and Visualize Workflows
Start by documenting the current process with your team, then visualize it using diagrams or tools like Kanban boards and Gantt charts. Use BPMN symbols for clarity and simplicity. -
BrightWork 365 Enables Workflow Automation
BrightWork 365 allow teams to implement and automate workflows quickly using templates, notifications, and task tracking, boosting productivity and collaboration
Multiple project deadlines, decision fatigue, and too much collaboration. Every day, we have to wade through information and distractions to get our core work done.
Some studies suggest that we process the equivalent of 174 newspapers’ worth of information on a daily basis, which can disrupt our focus, lead to poor decisions, and increase the risk of burnout.
Wouldn’t it be great if you could reclaim this lost time and focus on important tasks? Project management workflows, a way of completing tasks, can improve your productivity and keep projects moving with automation.
Keep reading to learn more about workflows and how to plan a workflow.
What is a Workflow?
A workflow is simply a way of getting tasks done in a logical sequence. Workflows guide a project through its entire lifecycle, from initiation and planning to execution and monitoring. You are likely using workflows every day, both inside and outside of work!
Workflow Visualization and Automation Principles
Workflows are typically presented as diagrams, linking small tasks together to achieve a final goal.
Henry Gantt invented workflows in the 1920s as a way of optimizing work. Gantt documented processes by asking three simple questions:
-
What tasks were being done?
-
Who was responsible for each task?
-
How long did each task take?
The same principles apply to workflows today. Where possible, steps are automated. For example, you could create a workflow to send an email reminder when a task is overdue. This way, you can stay on top of work without having to check on progress and send manual emails constantly.
Common Project Workflow Examples
Here are a few common examples:
-
An approval workflow for a new budget request.
-
A content approval process to move a blog post from draft to published.
-
A structured employee onboarding process for new team members.
-
A hiring workflow to manage candidates from application to offer.
Workflows can take any length of time and can be carried out by one person or an entire team. It depends on the goal. The aim is always to move between steps efficiently, freeing up time and energy for important tasks.
Automated Task Reminder Workflow
Unlike a checklist, each part of the workflow must be connected to a previous step. Using the example of project tasks, let’s say you want to tackle overdue work quickly.
During project set-up, tasks with deadlines are assigned to team members. Each individual receives a notification email and a reminder email 24 hours before the task is due.
If this deadline passes without completing the task, another reminder email is sent to the assignee. This email is sent daily until the task is complete.
Once the task is finished, the workflow ends. You could also send automated notifications to your own inbox when a task is late and when the task is completed.

Components of a Workflow
Workflows consist of four elements. Let’s take a closer look at each component using the example of a late project task above.
-
Actors – people or software responsible for the task. In this example, the failure to complete a task on time triggers an automated email.
-
Activities – the task that is performed, often represented as a step. Here, this includes completing the task.
-
Results – the desired outcome of each step, i.e., late tasks are finished.
-
State – the movement between steps. In this case, the task moves from ‘due’ to ‘late’ and ‘complete’ with minimum effort.
Each step of a workflow has three parameters as follows:
Input – the resources needed for a step.
Transformation – what actually happens to the input, for example, working on the task.
Output – the outcome of the step, which often acts as input to the next step.
3 Types of Workflows and Methodologies
There are also different types of workflows.
-
Process – A process workflow refers to predictable and repetitive tasks. The workflow has a clear path with few variations; for example, a project plan is either approved or rejected.
-
Case – A case workflow has an unclear path to conclusion, for example, a support ticket.
-
Project – Project workflows are similar to a process workflow, but with more flexibility to meet the needs of individual projects. These workflows help to drive the project forward.
These workflows are often applied within agile methodologies, such as Scrum and Kanban. Agile workflows prioritize flexibility and iterative progress.
In contrast, the more rigid waterfall methodology relies on a sequential workflow where each phase must be completed before the next begins.
Now that you know more about workflows, let’s look at the benefits of workflows for productivity and teamwork.
Why Should I Use Workflows?
A workflow is a framework for completing tasks the same way, every time.
Having a documented way of working keeps your team on the same page and eliminates bottlenecks.
Workers waste up to 3.5 hours every week trying to find information. Using workflows to hand over documents and tasks as needed can reclaim this time.
How Workflows Improve Efficiency and Collaboration
In fact, an individual workflow can save an organization up to three minutes. This small gain adds up over time!
Workflows save time by automating repetitive tasks that do not require decisions. They reduce errors and rework while collecting data quickly to support informed decision-making.
Workflows also standardize ways of working and help create a project communication plan that enhances collaboration within and between teams.
It also identifies and eliminates bottlenecks, clarifies task dependencies, and creates a baseline for continuous improvement.
Advantages of Using Workflows for Teams
Workflows are really powerful for project teams, helping to:
-
Improve scheduling with clear insight into the duration of tasks.
-
Increase stakeholder engagement with approval workflows and notifications.
-
Increase collaboration with insight into individual responsibilities and progress.
-
Quickly introduce new team members to the project.
-
Create an audit trail for key decisions.
-
Provide easy-to-follow instructions for tasks.
-
Clarify hand-off points for tasks and documents.
With workflows running in the background for various tasks, you can focus on the project itself and deliver the expected results more smoothly.
The team will know what is expected of them, what they need to focus on, and what is automated.
Steps to Build an Effective Workflow
A workflow represents a business process, a way of working in your organization. A process defines all of the inputs needed for a task, such as data, reports, and decisions. A workflow is a sequential ordering of the tasks and is part of a process.
Before turning to software, you need to document the process you want to automate. Gather your team for a workshop to walk through the process from start to finish as many times as needed.
Use a whiteboard to draw and re-draw the process until everyone agrees on the steps. Focus on the current process, not the ideal one. In time, you can identify improvements, but you need to start with the ‘as-is’ state.
Important Elements to Document
Cover key elements like:
-
The start and endpoint
-
Inputs
-
Outputs
-
Key activities
-
Task owners
. -
‘What-if’ scenarios, for example, what if a developer is not available for a task?
-
Documents associated with any steps.
With workflows running in the background for various tasks, you can focus on the project itself and deliver the expected results more smoothly.
The team will know what is expected of them, what they need to focus on, and what is automated.
Visualizing the Workflow
Once the as-is process is documented, it’s time to create a workflow diagram. While many flowchart tools are available, teams often use other visuals to manage work, such as a Kanban board to track task progression through stages, and a Gantt chart to visualize timelines and dependencies.
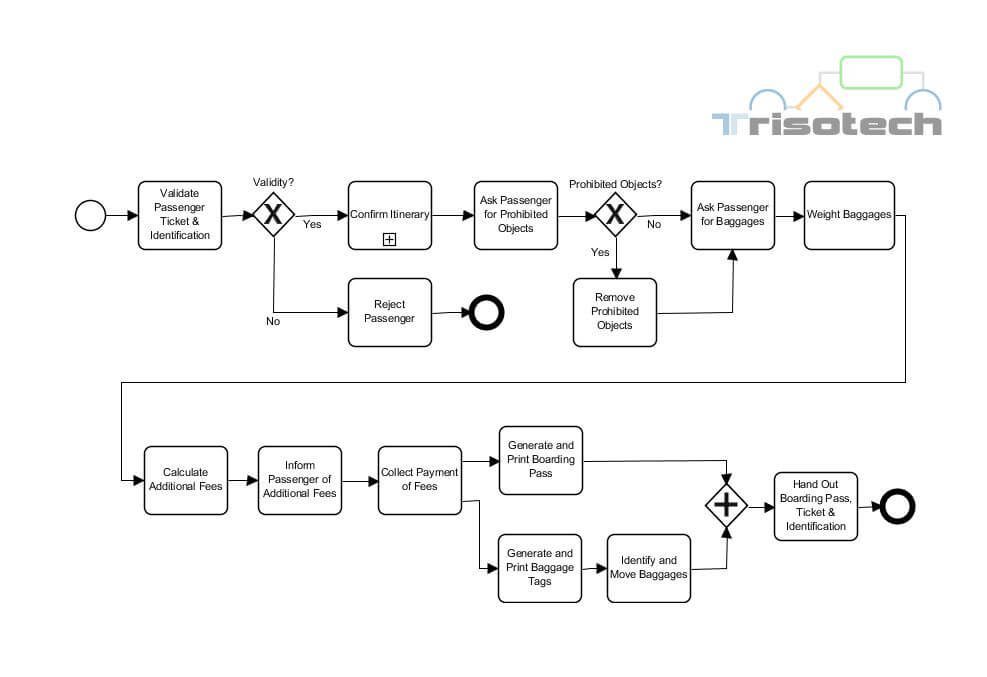
Shapes are frequently used to categorize elements of the process in a clear and easy-to-understand manner. The standardized system of symbols used in Business Process Model and Notation (BPMN) includes:
-
A circle is used to mark an event, such as the start of the process.
-
Rectangles indicate tasks.
-
A diamond is a decision point.
-
An arrow marks the flow or movement between tasks.
Keep diagrams simple. If one person can complete a task alone, use a single box to represent it. After creating the workflow, think about:
Automating tasks using software.
Removing unnecessary steps.
Tasks that can be completed simultaneously.
Ask the team to review the final workflow before automating tasks with software.
Using Workflow Automation
With BrightWork’s SharePoint-based workflow management software, teams can implement their documented processes in minutes.
A great starting point is to use a pre-built workflow template for common processes, such as document approvals or task assignments.
This software can be configured to send out automated notifications for status updates or late tasks, ensuring everyone stays informed without manual intervention.
How BrightWork 365 Supports Smarter Project Workflows
Workflows are powerful productivity tools with significant benefits for project teams. With BrightWork 365, you can set up workflows quickly, automate notifications, track tasks, and streamline approvals.
Start simple by working with your team to identify important yet repetitive tasks that are ideal for automation. In time, add more complex workflows to improve task management and collaboration.
Contact us to learn how BrightWork can help your organization optimize workflows and boost productivity.