

It’s critical to keep your stakeholders happy, or at the very least, informed. If you have a good communication line with your stakeholders, this can often determine whether a project succeeds or fails.
During the initiation stage of your project (and throughout!), it is key to identify the following about your stakeholders:
-
Who are they?
-
What requirements do they have?
-
How influential are they in making decisions about your project?
-
What do they expect from the project?
-
What do you need to communicate to them?
-
How will you communicate with these stakeholders?
-
The level of frequency.
Remember that you should gather this information before starting any project work. Keep it updated as the project progresses.
Where to Manage Stakeholder Information
Instead of relying on spreadsheets or disconnected documents, Power Platform offers a centralized, dynamic way to manage stakeholder data using Power Apps. You can build a custom Stakeholder Register app that integrates seamlessly with your project site, making it easy to update and share information in real time.
It’s ideal to have this in one central spot – and there is no better tool than SharePoint to do this. I’ll create this SharePoint during the initiation stage, but it’s not a one-and-done task.
People’s roles will change, new project stakeholders may be identified, new reports will be created, and new meetings might be set up. Your stakeholder register should be flexible and easy to update as needed.
In BrightWork 365 templates, this is called the Teams tab.
Steps to Add a Stakeholder Register to a Project in BrightWork 365
The Team tab in BrightWork 365 intelligently aggregates project team members based on their assigned work items, displaying their earliest start and latest finish dates to give a clear view of resource timelines.
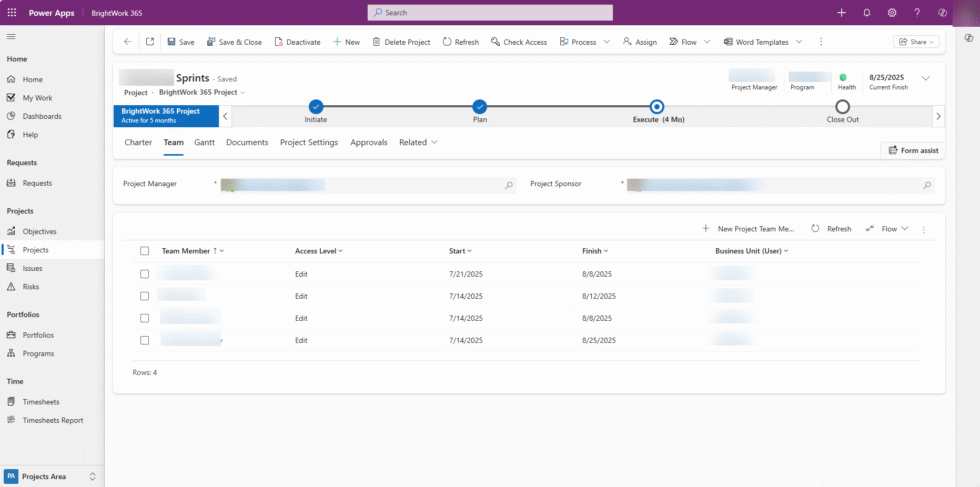
Project Manager and Project Sponsor
Fields for Project Manager and Project Sponsor are visible, each populated with a name.
Team Member Table
Displays a list of project team members with the following columns:
Access Level: All team members and what level of access they have in this project.
Start Date and Finish Date: These reflect the earliest and latest dates of assigned work for each team member.
Business Unit: Which business unit the team member is assigned to (for security purposes).
If a stakeholder or team member hasn’t yet been added through task assignment, you can manually include them by selecting + New Project Team Member, ensuring your register remains complete and up to date.
Other Fields to Consider in Your Project Team Member Table
Next, add more columns to fit your project and stakeholder needs. You can use the chart below as a starting point and customize it as needed depending on your level of project and stakeholder management.
Job Title,
Category,
Company,
Mobile Number,
Business Phone,
Email Address,
Project Role,
Influence,
Requirements,
Expectations,
Interests,
Sign-Off,
Communication Method,
Direct Involvement,
Steering Meeting Attendee,
Notes.
This is just an example. Feel free to adjust it based on your project needs. Once you have populated this form, you can share it with your stakeholders to confirm the details and ensure everyone is aligned. It’s also a good idea to check in with them regularly in case anything changes.
Keep Stakeholders Aligned with BrightWork 365
A clear and up-to-date Stakeholder Register is a simple but powerful tool for the project manager and project team members. It helps you manage communication, set expectations, and keep everyone aligned throughout the project lifecycle.
Once your Power App is live, you can:
-
Share it with your project team and stakeholders
-
Use it to track updates and changes
-
Embed it in your BrightWork 365 project site
-
Automate notifications and reminders using Power Automate
A centralized, flexible stakeholder register helps project managers stay proactive and responsive throughout the project lifecycle.